
Support Hub
Welcome to the ScribbleVet Support Hub where you can find step-by-step instructions for using ScribbleVet's AI scribe. Learn how to create appointments, record conversations, and generate customizable notes. You'll also find guidance on ScribbleVet's key features and tips for integrating ScribbleVet seamlessly into your practice workflow.
Have any questions that are not answered here? Let us know and a member of our team will get back to you shortly.
Getting started with ScribbleVet
Welcome to ScribbleVet! Let's get you set up and ready to speed up your veterinary note-taking. Follow these simple steps to access your account:
Step 1: Choose your device(s)
- Mobile: Download our app from the App Store or Google Play.
- Desktop: Visit our website and click the 'Sign in' button.
You can use ScribbleVet from your phone, exam room tablet, office desktop, all at the same time.
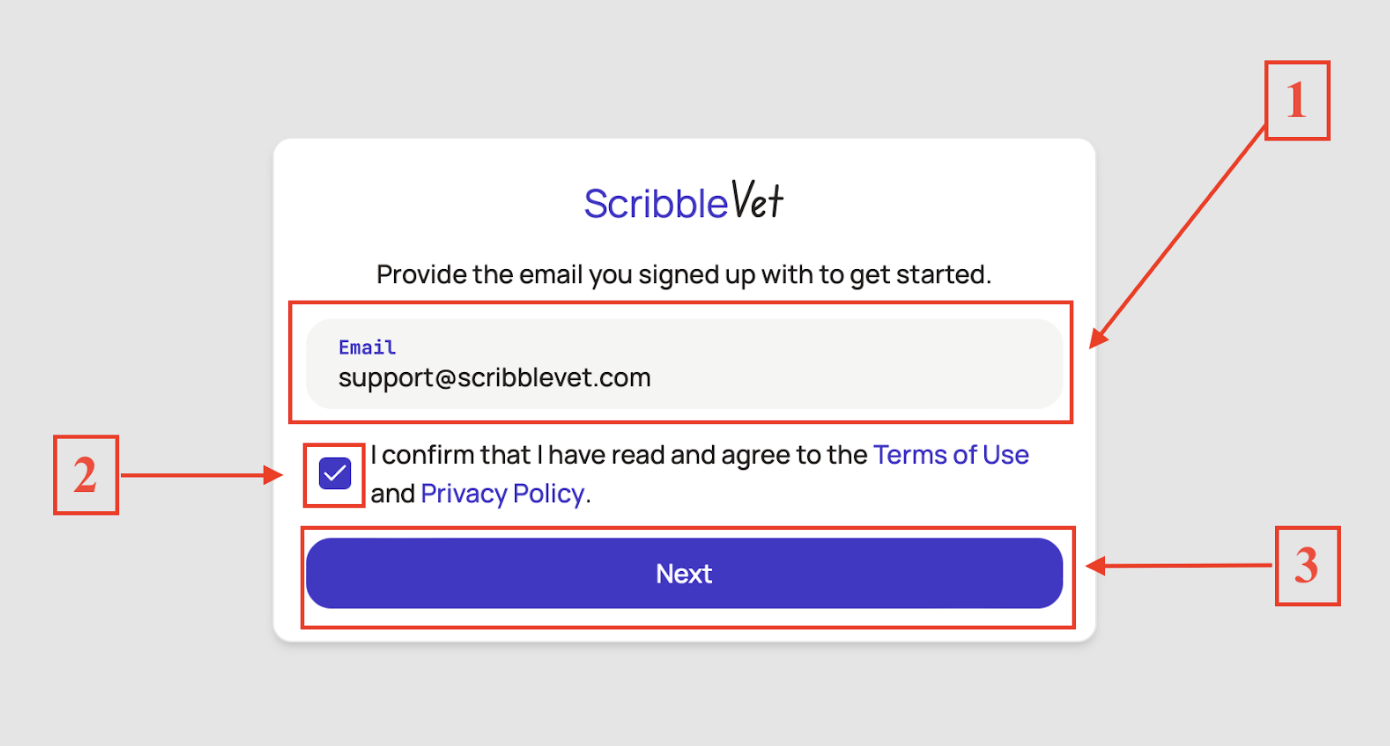
Step 2: Enter your email
- Type in the email address associated with your ScribbleVet account.
- Agree to the Terms of Use and Privacy Policy.
- Click 'Next' to proceed.
Step 3: Verify your identity
- Check your email inbox for a 6-digit login code from ScribbleVet.
- Can't find it? Check your spam folder
- Enter the code in the verification field and click 'Verify' to access your account.
Want to have an alternative log-in method? Click here for steps to set up your account password.
Tricks and troubleshooting tips
- Multi-device support: Feel free to log in on multiple devices. Record notes on your phone in the exam room, then polish them up on your computer later.
- Team access: Other staff members, like your trusty vet techs, can use ScribbleVet under a DVM's account. Just remember, each DVM should have their own separate account.
- Log-in errors: The six-digit login code is generated each time you sign in and can only be used once. Usually, the codes expire in about 10 minutes. To request a new code, enter your email on the sign-in screen and hit continue. A new code should be emailed to you within a few seconds.
If you cannot find the code, even in your spam box, your email provider may be blocking the sender's address, so please ensure the @scribblevet.com emails are whitelisted.
Congratulations! You're now logged in and ready to start Scribbling!
Recording and generating notes
Ready to capture those important patient details? Let's walk through the process of creating a note in ScribbleVet:
Step 1: Create a new appointment
- Tap the purple '+' or '+ New' button to get started.
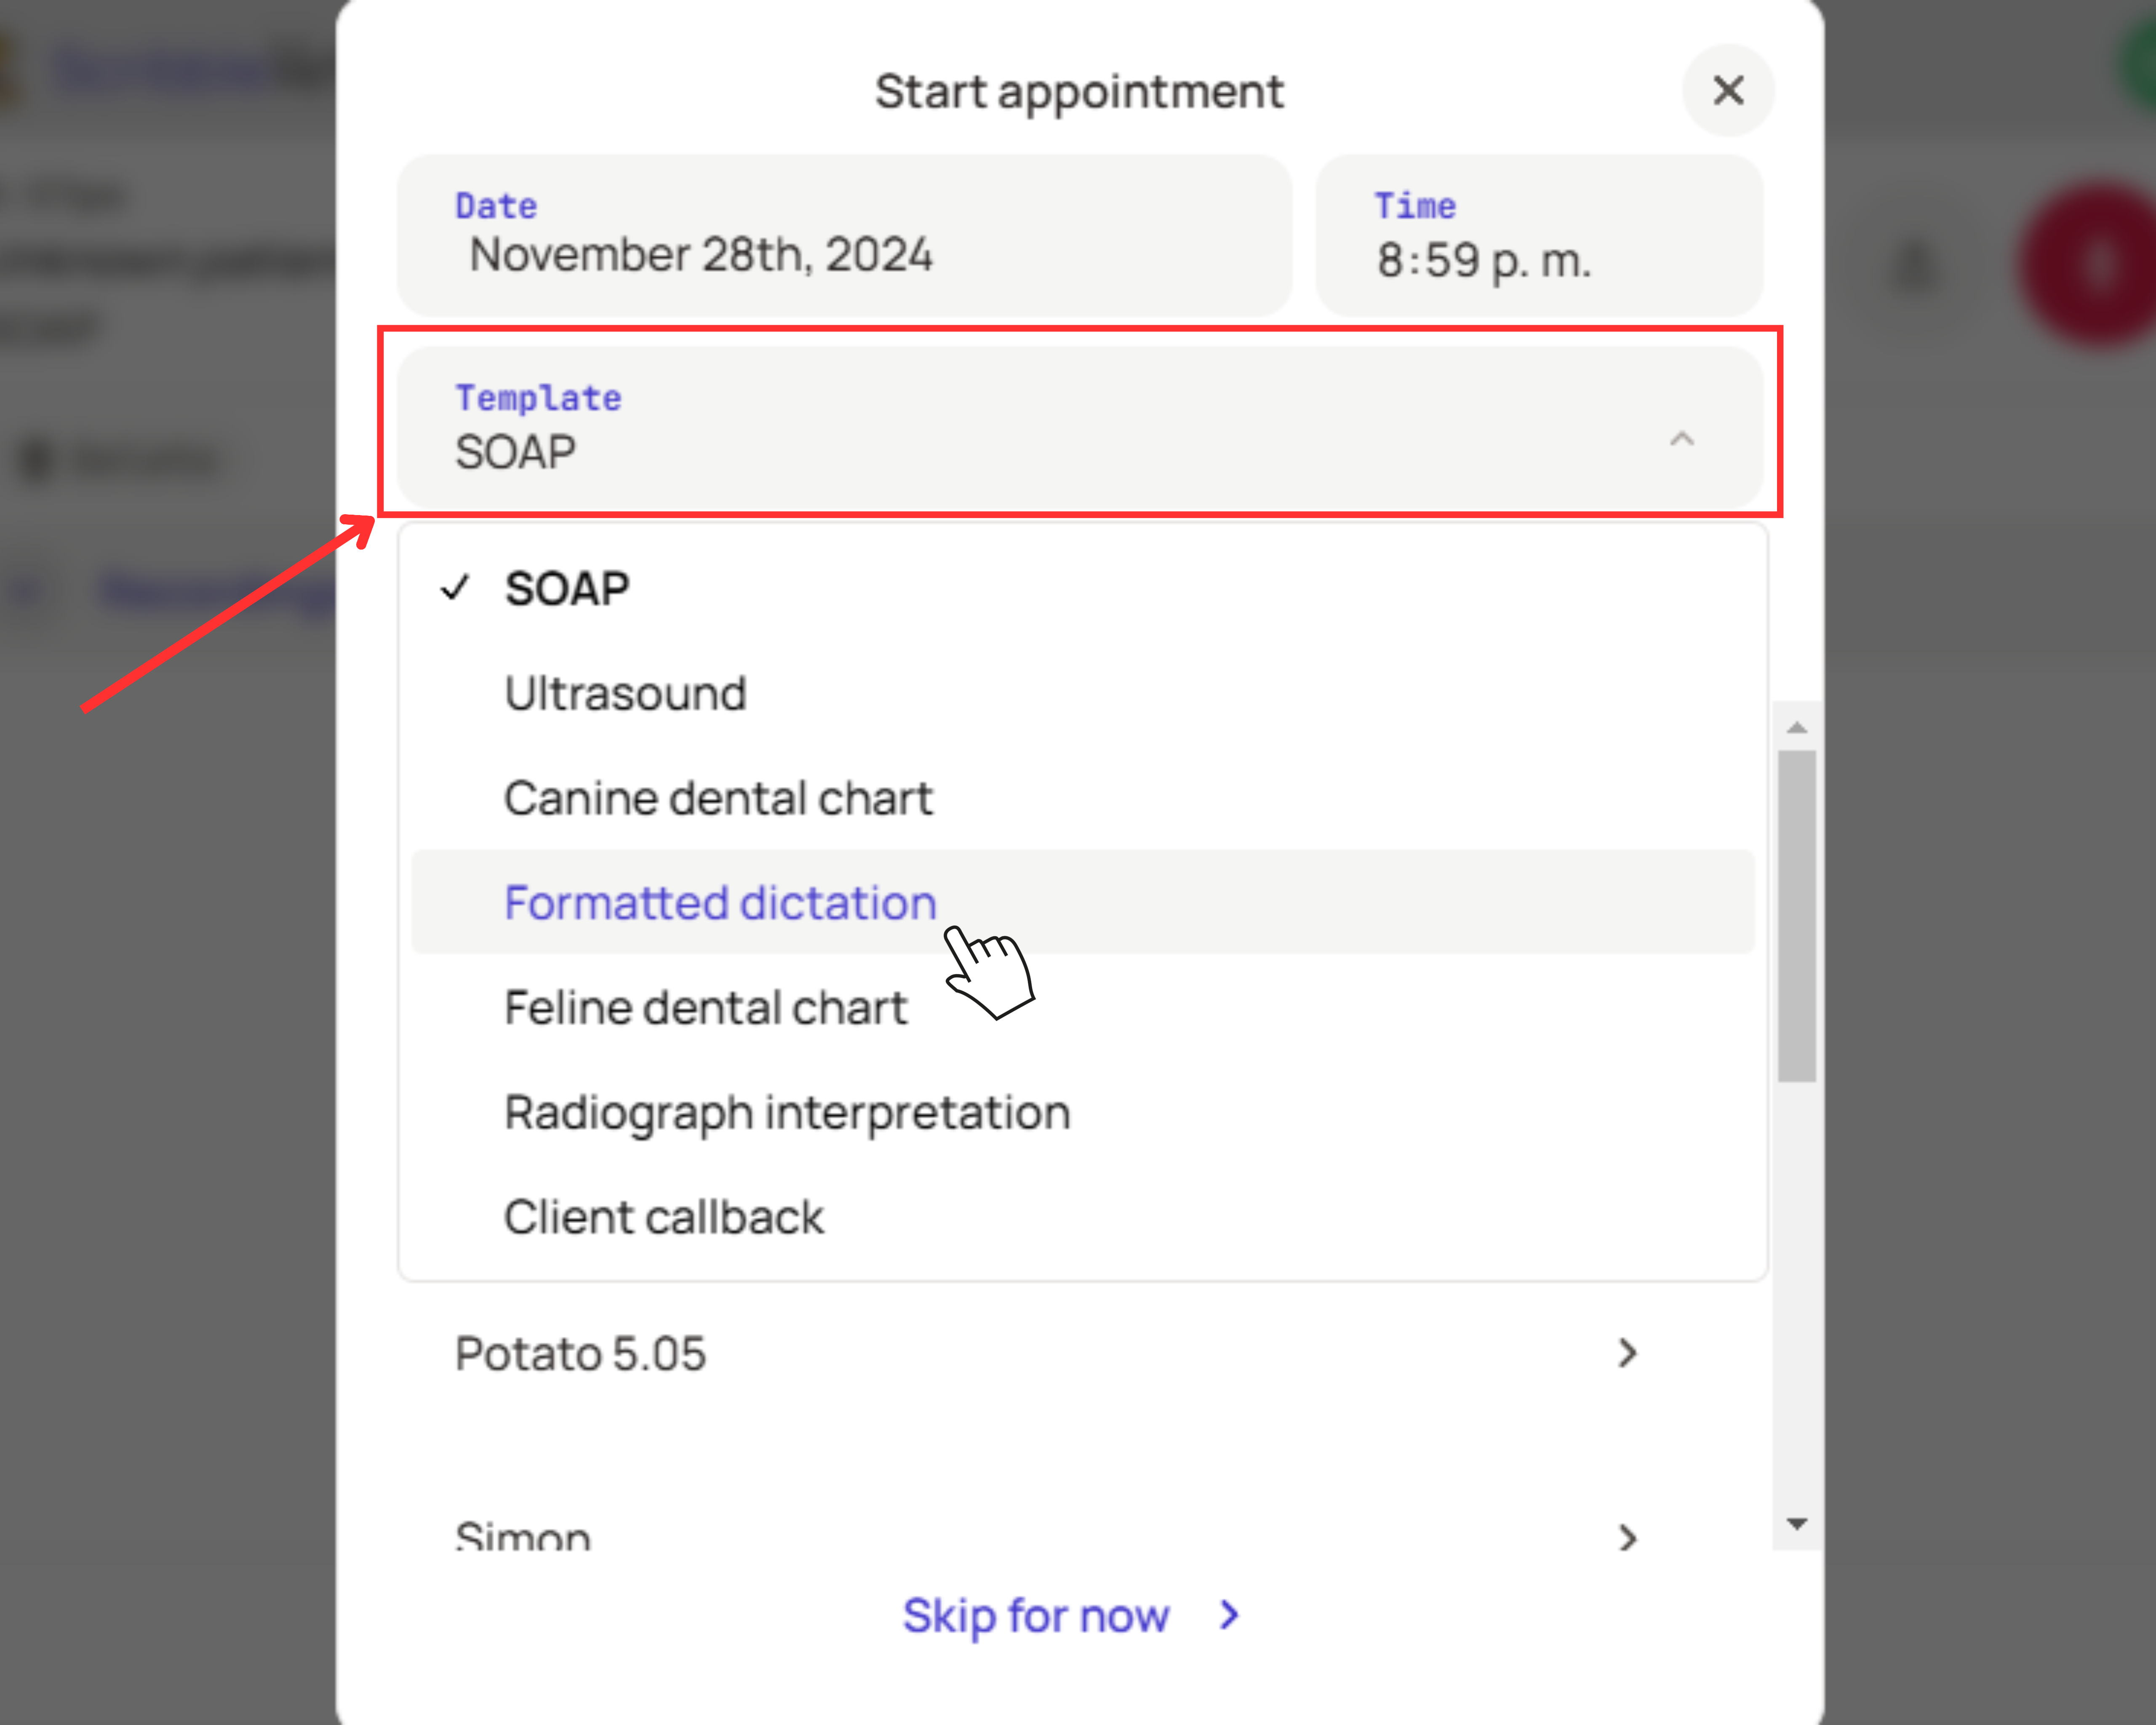
Step 2: Choose your template
- Select the note template that best fits your appointment type.
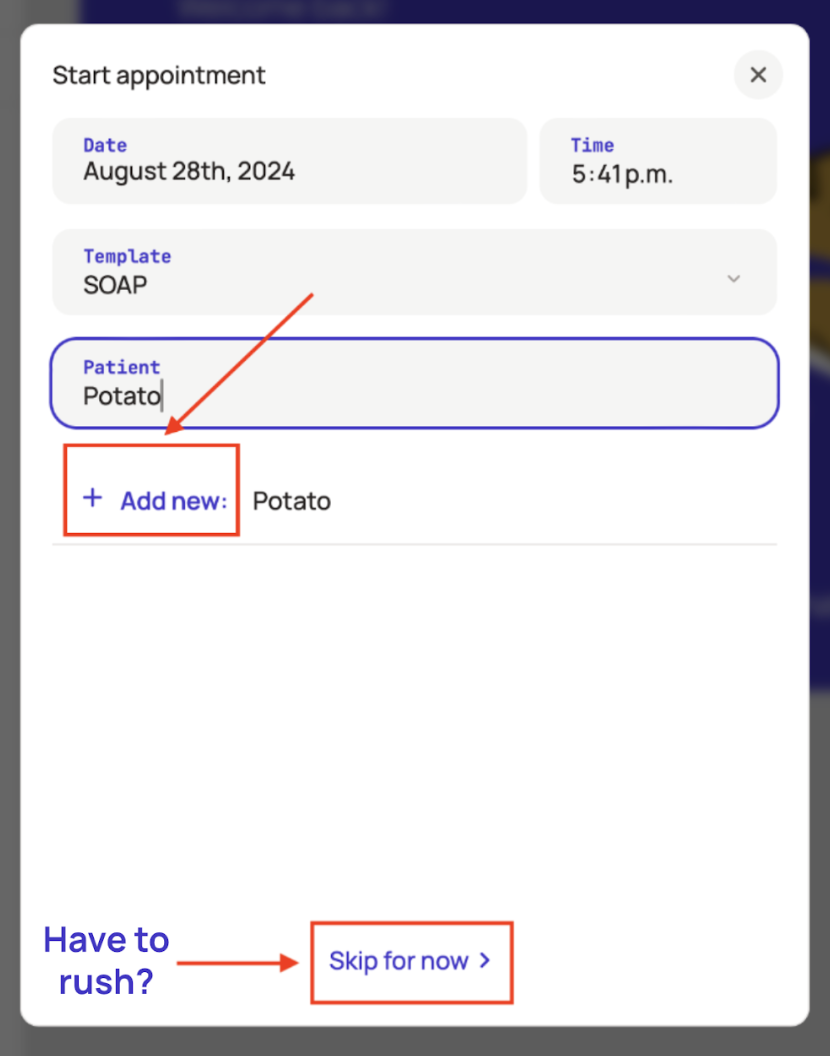
Step 3: Add patient details
- Enter the patient's name.
- For new patients, hit "Add new".
- For returning patients, select their name from the patient list.
In a rush? Hit "Skip for now" to start recording immediately and add patient details later.
Step 4: Obtain client consent
We require the client’s consent if they are being recorded. The main points of consent are: 1) the client is recorded, and 2) the recording is sent to a service.
Client consent can be obtained directly on the recording or in writing:
- Sample written consent form
- Sample verbal consent verbiage: "Do I have your consent to record this conversation so that I can send it to a service that helps with my medical documentation?"
We recommend consulting your legal team for tailored advice regarding applicable local and national laws.
Step 5: Start recording
- On the recording screen, tap the red microphone button.
- Look for the "Listening for..." message – that's your cue that ScribbleVet is all ears!
Step 6: Capture the conversation
- Record any relevant information: patient history, physical exam findings, lab results, or your own dictated notes.
- Don't worry about background noise or small talk – ScribbleVet filters those out automatically!
- Tap the red stop button when you're done speaking. Your audio file will appear below the recording screen. Record as many times as you need!
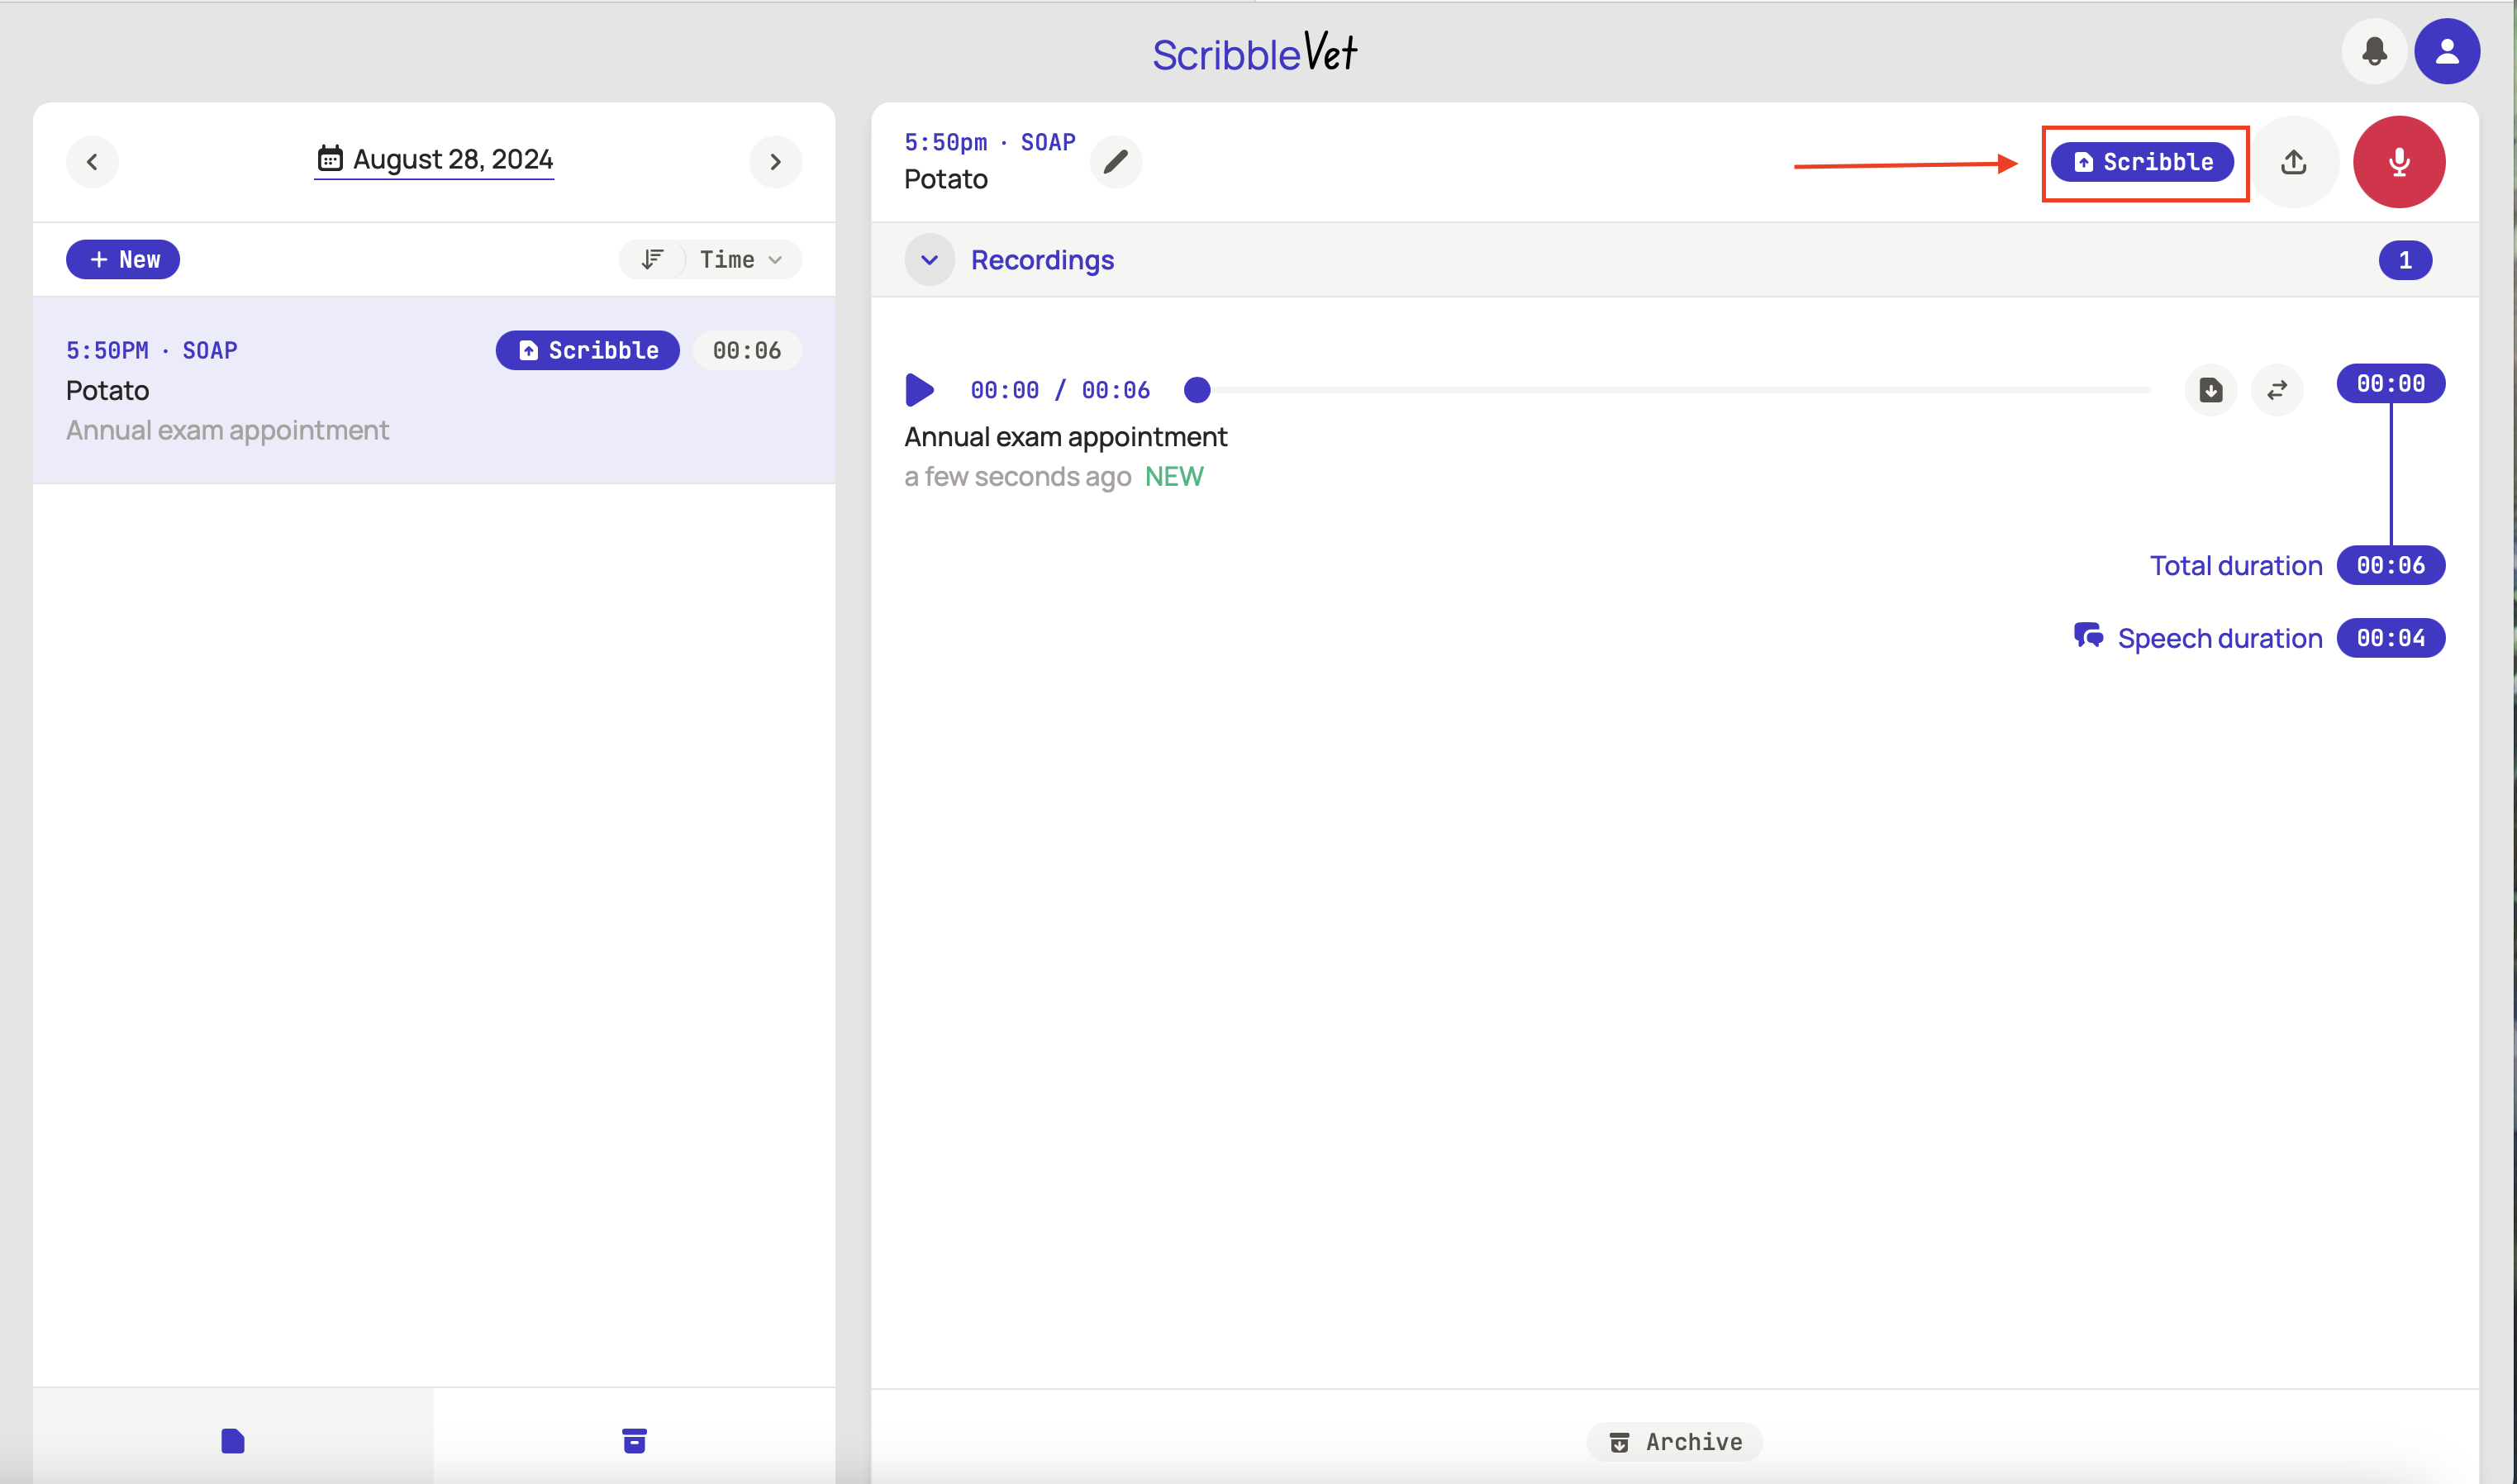
Step 7: Generate your note
- Hit the purple "Scribble" button and ScribbleVet will start producing the note.
- Notes typically complete in a couple minutes. Longer audio recordings or busier parts of the day may result in longer scribbling times, but it should never take more than 5 minutes to return a note.
Step 9: Review and repeat
- You can record and hit "Scribble" as many times as you like. This allows you to record and generate notes iteratively throughout your appointment.
And there you have it! With ScribbleVet, creating detailed, accurate notes is as easy as having a conversation.
Editing your notes
Ready to review and edit your notes? Let's explore the editing tools available on the ScribbleVet website:
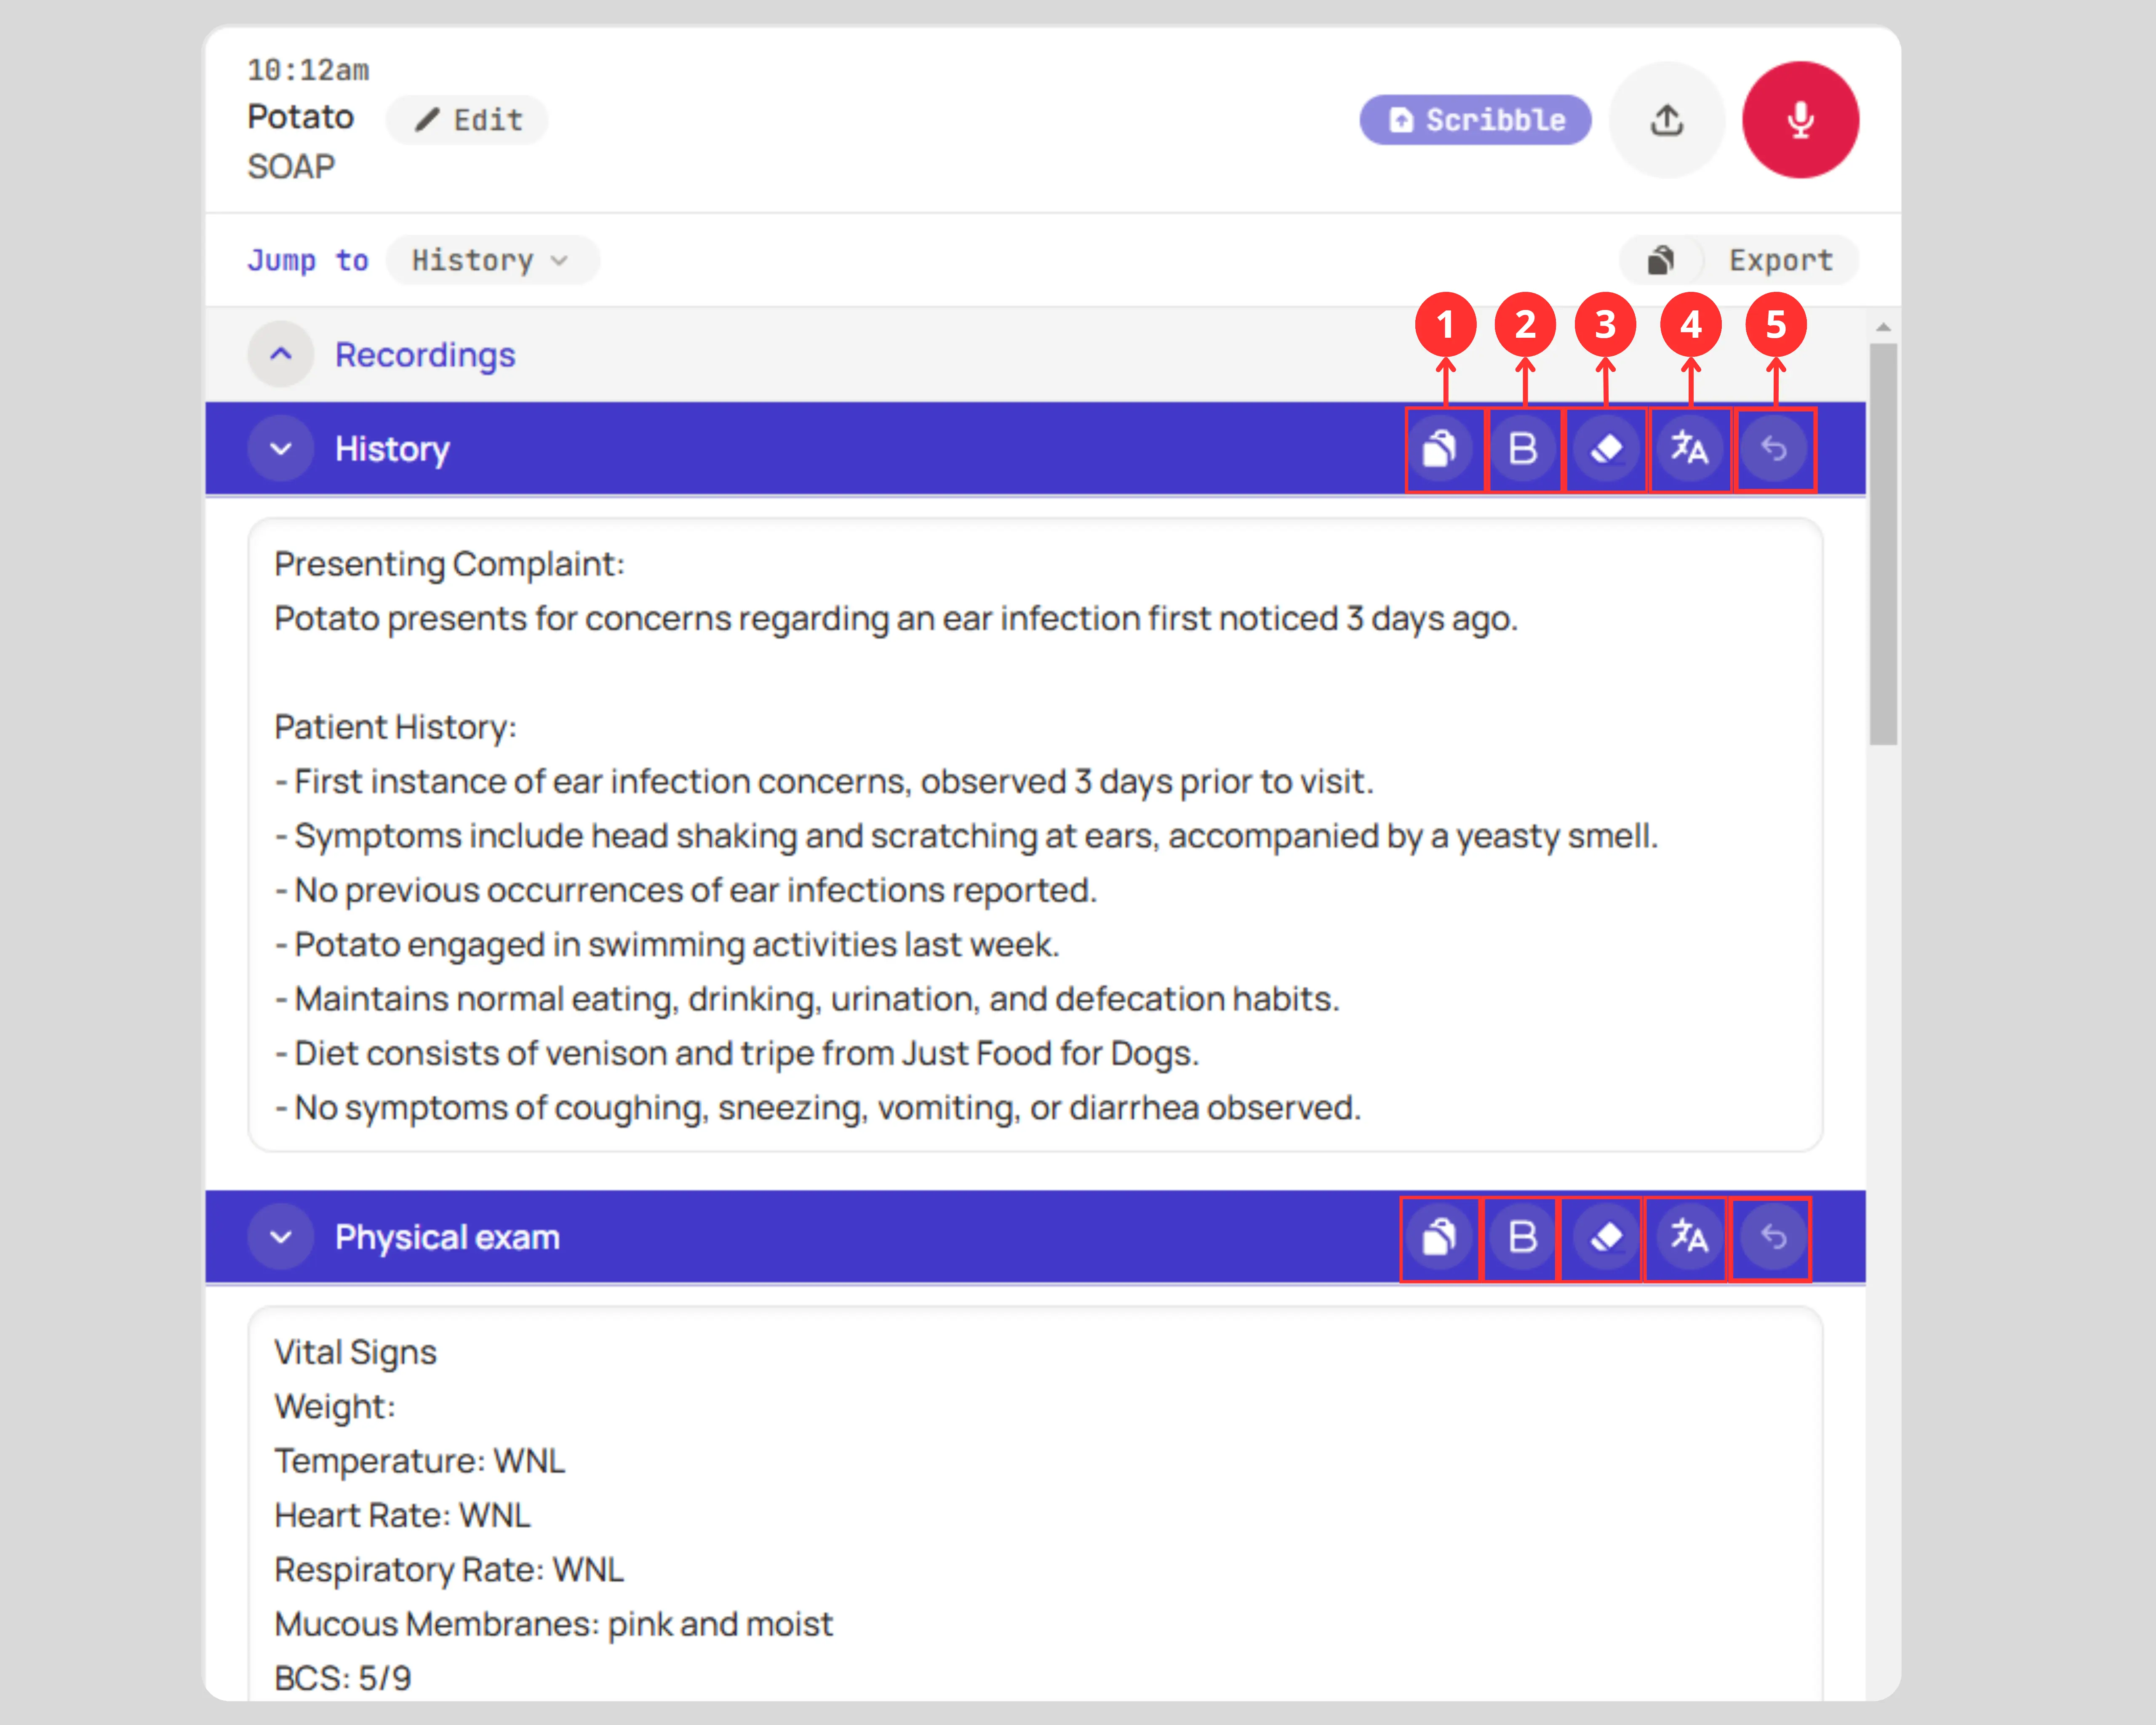
Section-level tools
Each section header (e.g., History, Physical Exam) comes with handy tools:
- Copy: Copy all the text within a particular section.
- Bold: Toggle bold formatting for highlighted text.
- Clear Formatting: Remove all bold formatting in the section.
- Translate: Translate the note output into another language such as Spanish or French.
- Undo: Revert manual edits to the latest AI-generated version.
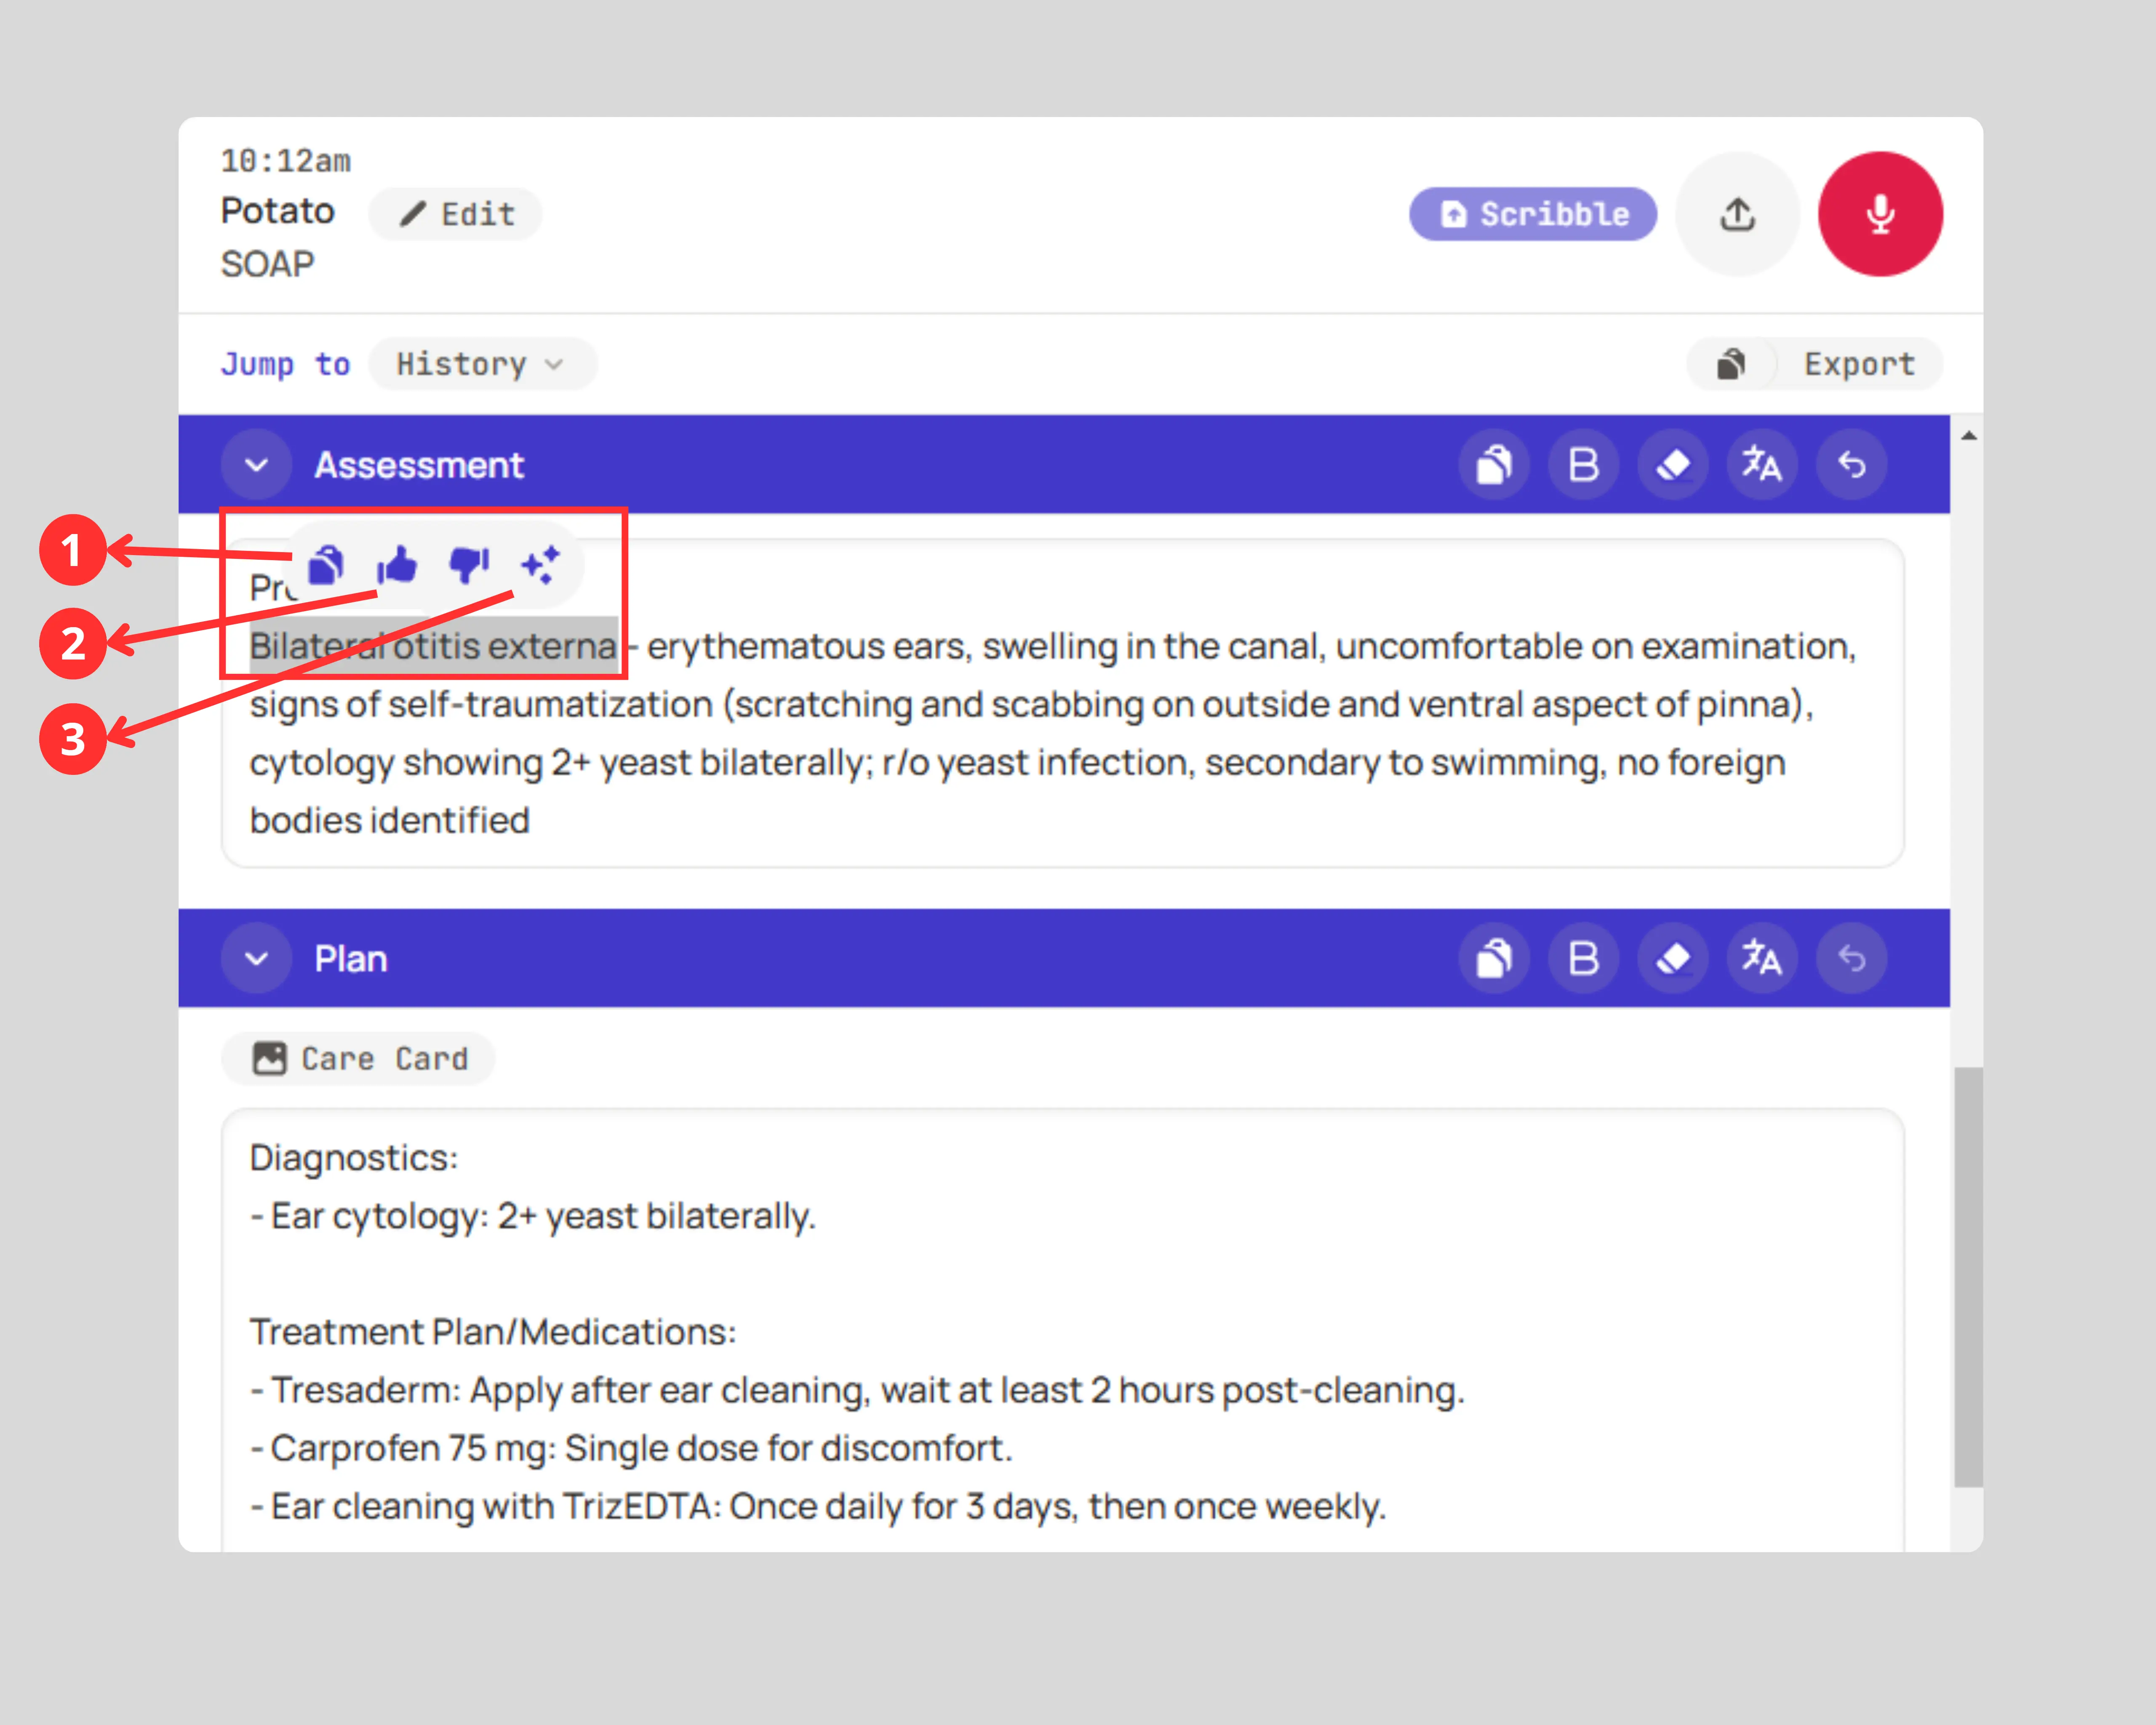
Text highlighting features
Highlight specific text to access a secondary menu with these options:
- Copy: Copy just the highlighted text.
- Share Feedback: Use thumbs up/down buttons to help us improve.
- AI Include Details: Prompt the AI to dig deeper into your recordings for more relevant information. "Include Details" is useful when you want to expand on points that the AI might have summarized too briefly.
Continuous recording and Scribbling
If you have a lot of details to add (e.g. lab results, progress notes, etc.) you can always:
- Record or dictate new details at any time.
- Hit "Scribble" again to regenerate the note with the latest info.
- Caution: Re-generating will overwrite any manual edits
Mark your notes as reviewed
When you're done editing your notes, tap the "Mark Reviewed" button at the bottom to help remind yourself and others that you've finished reviewing this particular note. A copy of your note will also be emailed to you.
Transferring notes from ScribbleVet to your PIMS
Ready to get your ScribbleVet notes into your PIMS? Here are various methods and tips to help streamline the process:
1-Click transfer to your PIMS
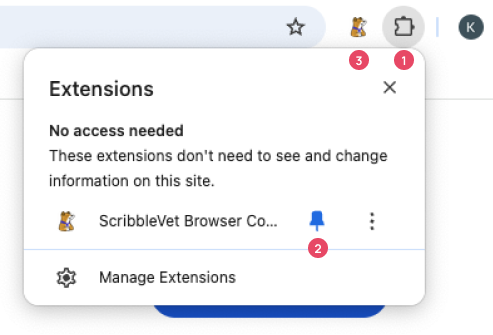
Set up the ScribbleVet Browser Companion
- Install the ScribbleVet Browser Companion (available on Chrome and Edge)
- Click the puzzle piece [1] in the top right corner of your browser and ‘Pin’ [2] the ScribbleVet Browser Companion to your extension bar.
- Log into ScribbleVet on your browser.
- Open the Browser Companion by clicking on the Potato icon in the extension bar [3]
- The Browser Companion should automatically be logged into your ScribbleVet account. If this is not the case, please close the extension and re-open it after logging into ScribbleVet.
How to copy your notes from ScribbleVet to your PIMS
- Navigate to your PIMS system.
Currently supported PIMS include: ezyVet, Pulse, Instinct, Daysmart, Rhapsody, Vetspire, Shepherd with more coming soon - Open the appropriate Appointment in both your PIMS and the equivalent Scribbled note in the ScribbleVet Browser Companion.
- Click on “Link to section” and map each section within ScribbleVet to the appropriate section in your PIMS template you’d like it to be copied to. Your mapping preferences will be saved for subsequent notes.
- Click “Add all” to copy your ScribbleVet note into your PIMS. Any section left as “Link to section” will not be copied over
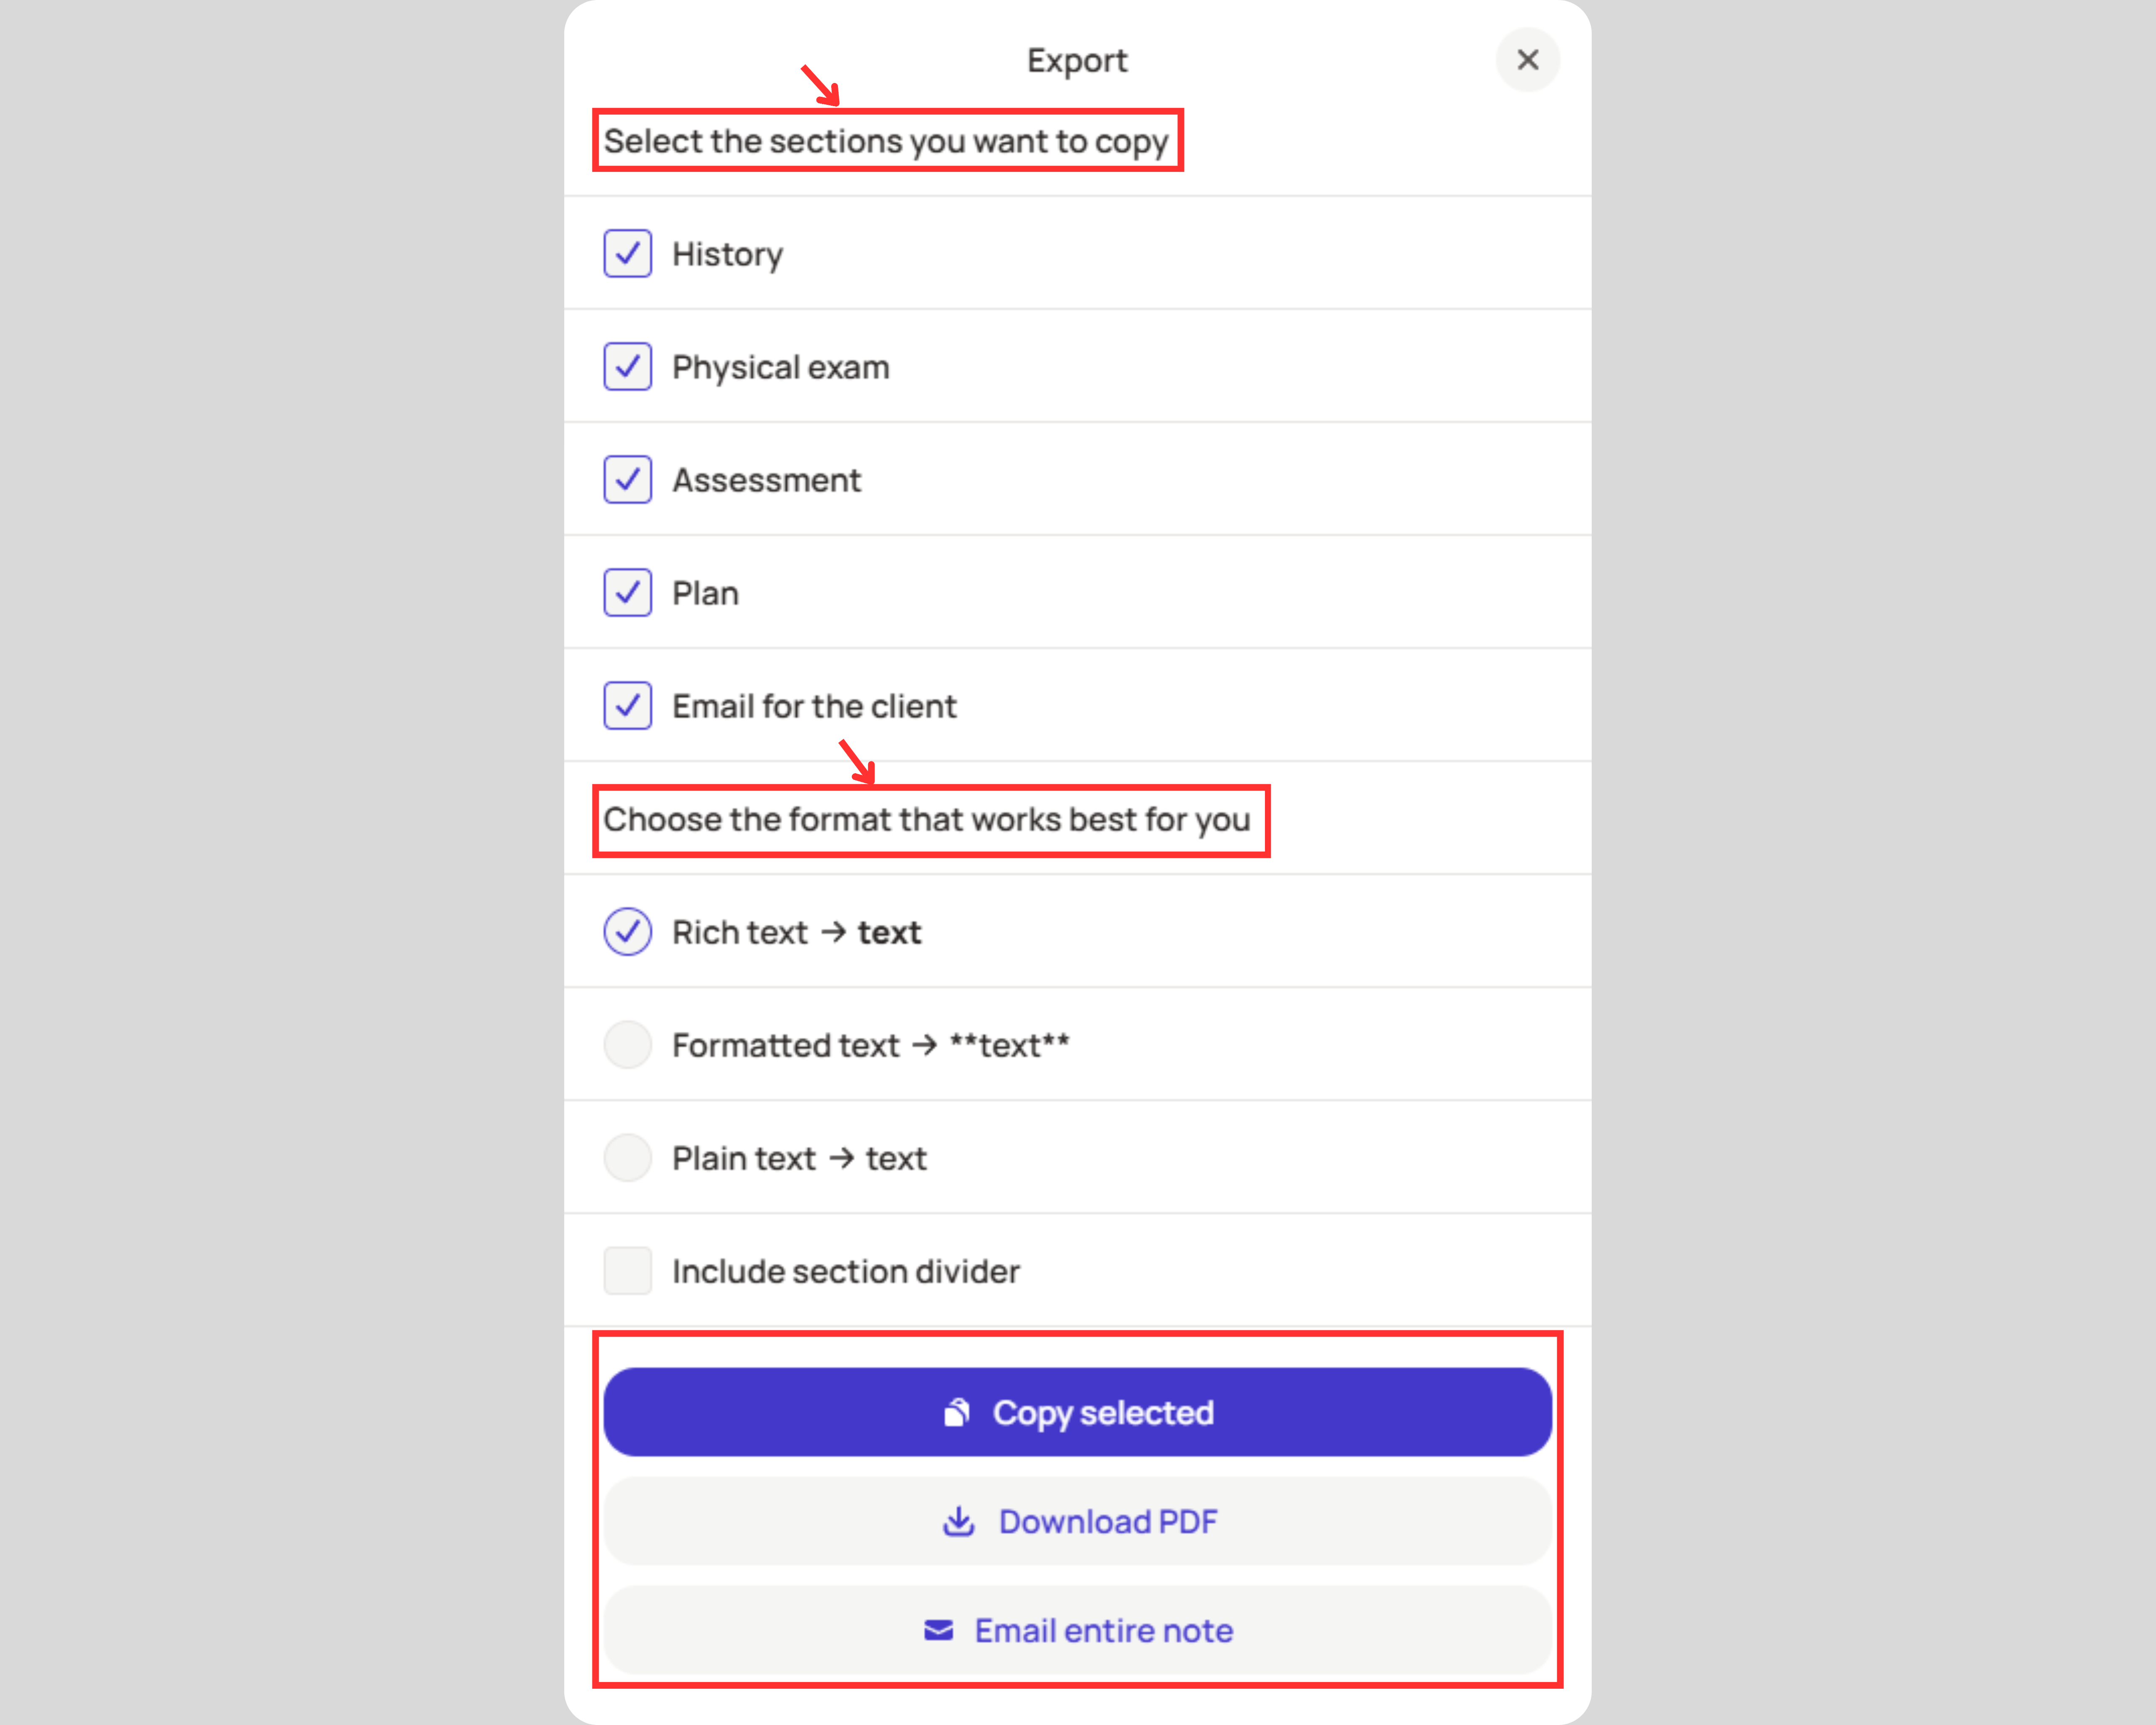
Export
- Multi-Section Copy: Select the sections you want to copy by checking the corresponding boxes.
- Section-by-Section: Use the "Copy" button on each section header to transfer specific parts of your note(e.g., History, Physical Exam, Email to the client).
- Preserve Formatting: Select your preferred "format" to maintain formatting when transferring to your PIMS. We recommend:
> Rich text for Shepherd, Rhapsody
> Formatted text for Cornerstone, Instinct, ezyVet
> Plain text for Avimark - Copy Selected: Copy the selected sections.
- Download PDF: Download the selected note sections as PDFs.
- Email entire note: Send a copy of the entire note via email to yourself or colleagues.
Notify your team about reviewed notes
Use internal workflow indicators
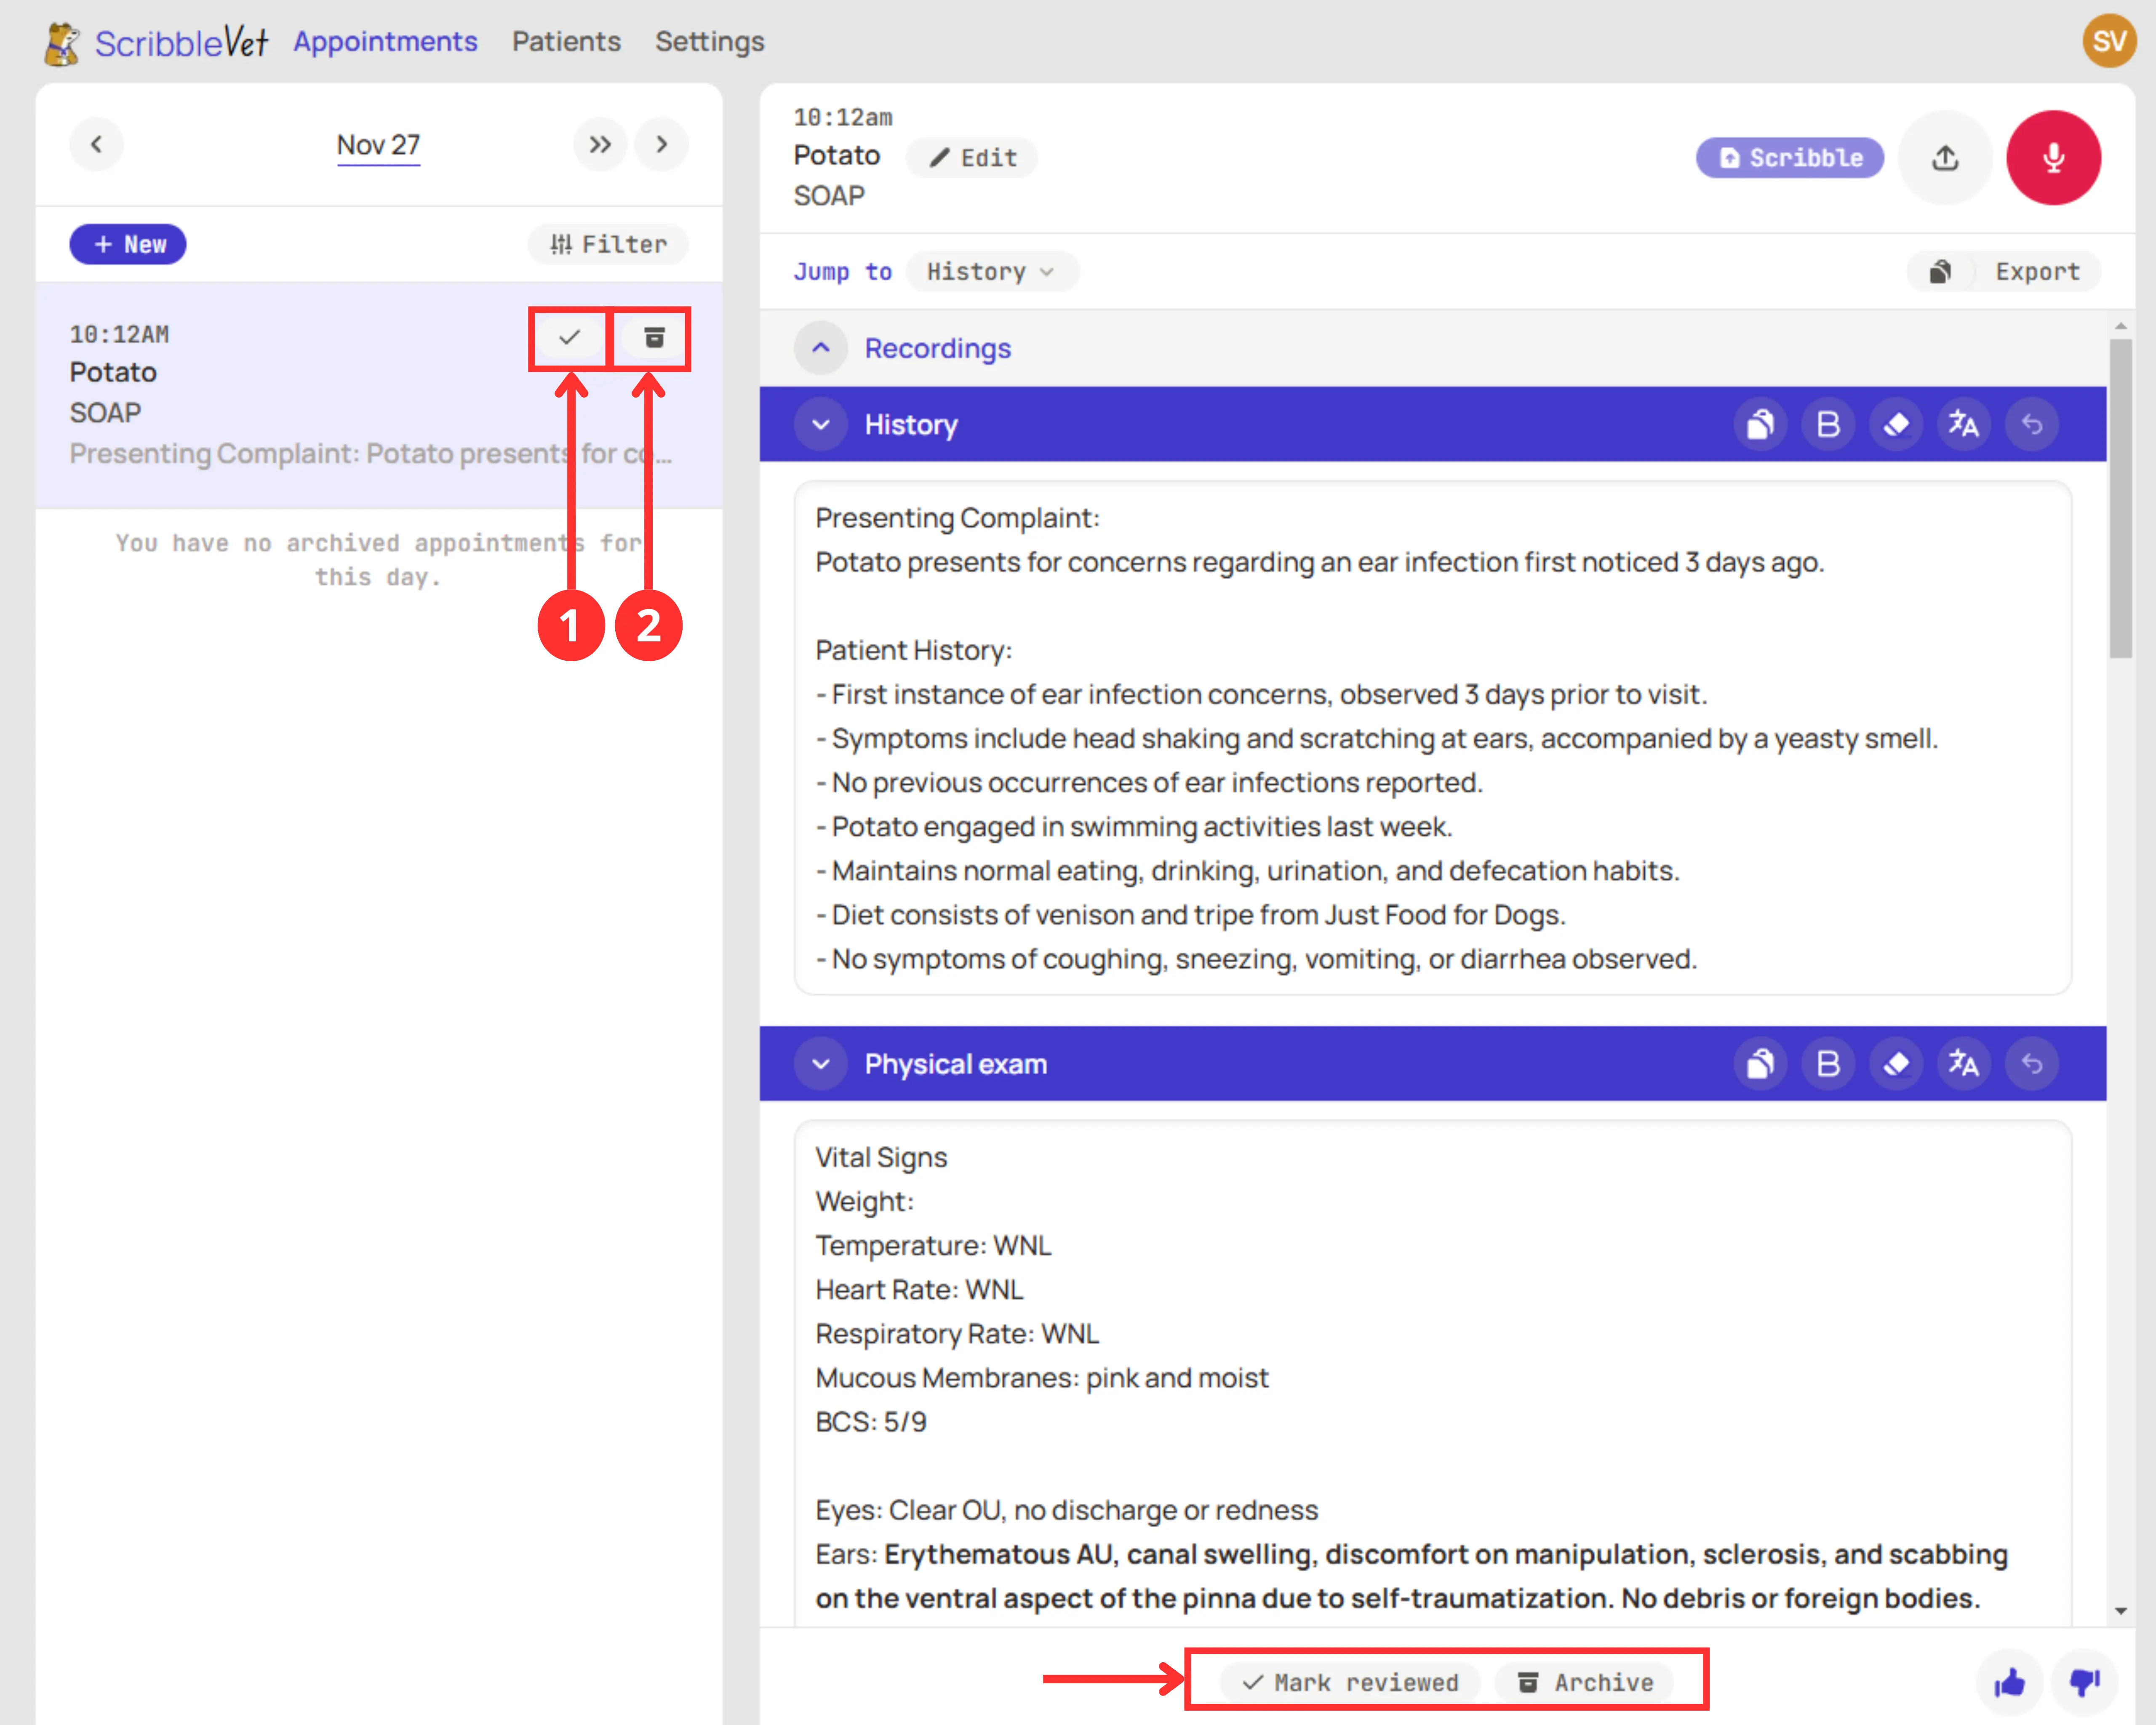
- Marked Reviewed: Click the "Mark Reviewed" button when you've finished editing a note.
> Team members can now see the note is ready to be transferred, and can help copy it into your PIMS. - Archive: Once a note is copied, click the "Archive" button at the bottom of the note to remove it from the working list.
Note: You can also click on the corresponding icons next on the appointment list to mark a note as reviewed or archive it, respectively.
Set up email notifications
- Configure your email preferences to automatically send reviewed notes to a shared inbox or team member.
- They can then copy the notes directly from the email.
Streamline with customization
We can customize your ScribbleVet notes to match your existing templates! This can significantly reduce editing and copying time. Check out our template customization guide to learn more.
Choosing the right template
While SOAP notes are our most popular format, ScribbleVet offers a variety of templates to suit different scenarios. Explore when and how to use these templates:
Selecting a template:
- Before Scribbling: When you click "Scribble" a confirmation screen will appear. Under the "Template" section, you can choose from a list of templates. Hit "Scribble" again to generate the note.
- At any time: Hit the "Edit appointment" button to pull up the appointment details menu. Select the desired template under the"Template" section.
- On the mobile app template changes will save automatically.
- On the website, hit "Save" after changing the template.
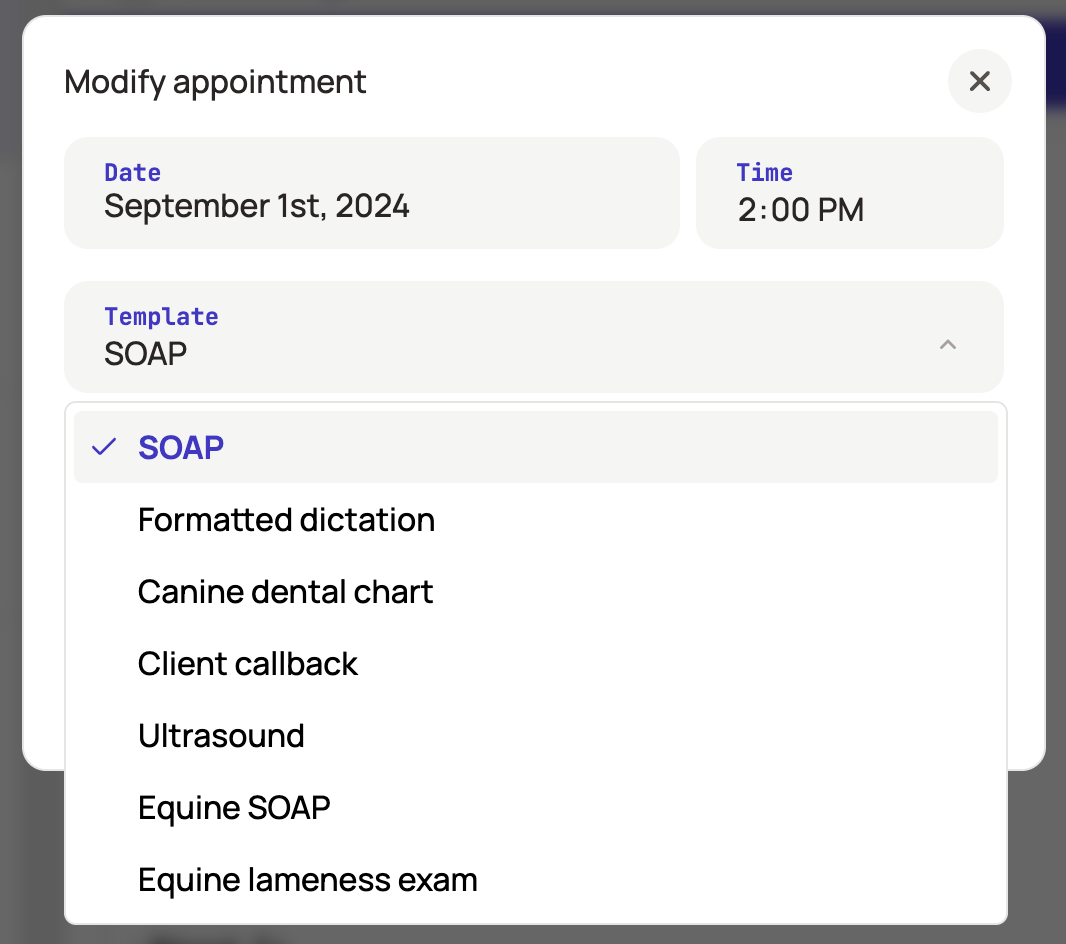
Available templates:
- SOAP (Default)
The classic Subjective, Objective, Assessment, Plan format. Perfect for standard small animal appointments and exams. - Client Callback
Produces a summary of the audio recording, including a bulleted plan if relevantIdeal for: Follow-up calls or brief client conversations - Formatted Dictation
Transforms your dictation into a clean, well-formatted note
Ideal for: Quick capture of lab results, transfer notes, surgery details, and more - Canine and Feline Dental Charts
Generates a visual dental chart based on your dictation mapping dental scores and findings to appropriate teeth
Ideal for: Dictating your Comprehensive Oral Health Assessment and Treatment (COHAT) - Radiograph Interpretation
Turn x-ray observations into expert radiograph reports. ScribbleVet generates a professional radiograph report, formatting your findings and clearly outlining the roentgen signs.
Additional templates (available upon request):
- Ultrasound
Designed for detailed ultrasound report findings, including recommendations and conclusions. - Narrative Dictation
Gives you a no-frills transcription, straight to the point and unformatted. (This template is in beta - we’d love to hear your feedback!) - Equine SOAP and Equine Lameness Exam
Tailored templates for equine or large animal veterinarians.
If you change the template on an appointment with an existing note, we will re-generate it for you in the style of the new template. Don't hesitate to experiment with different templates to find what works best for each situation to streamline your note-taking process.
Customize your SOAP notes
Did you know you can tailor your ScribbleVet SOAP to match your existing notes? We recommend setting up your personalized template early to avoid unnecessary editing, though you can always make changes later.
Examples of what you can customize:
- Format (bullet points or paragraphs)
- SOAP structure (add, remove, or reorganize subsections)
- Physical exam details (reorder systems, add custom fields, set default normals)
To request changes:
• Email us with your desired modifications
• Or send an example of your current note template with defaults filled in
We typically complete customization requests within 3-5 business days.
Set your ScribbleVet password
Want to streamline your login process? Set up a password for your ScribbleVet account:
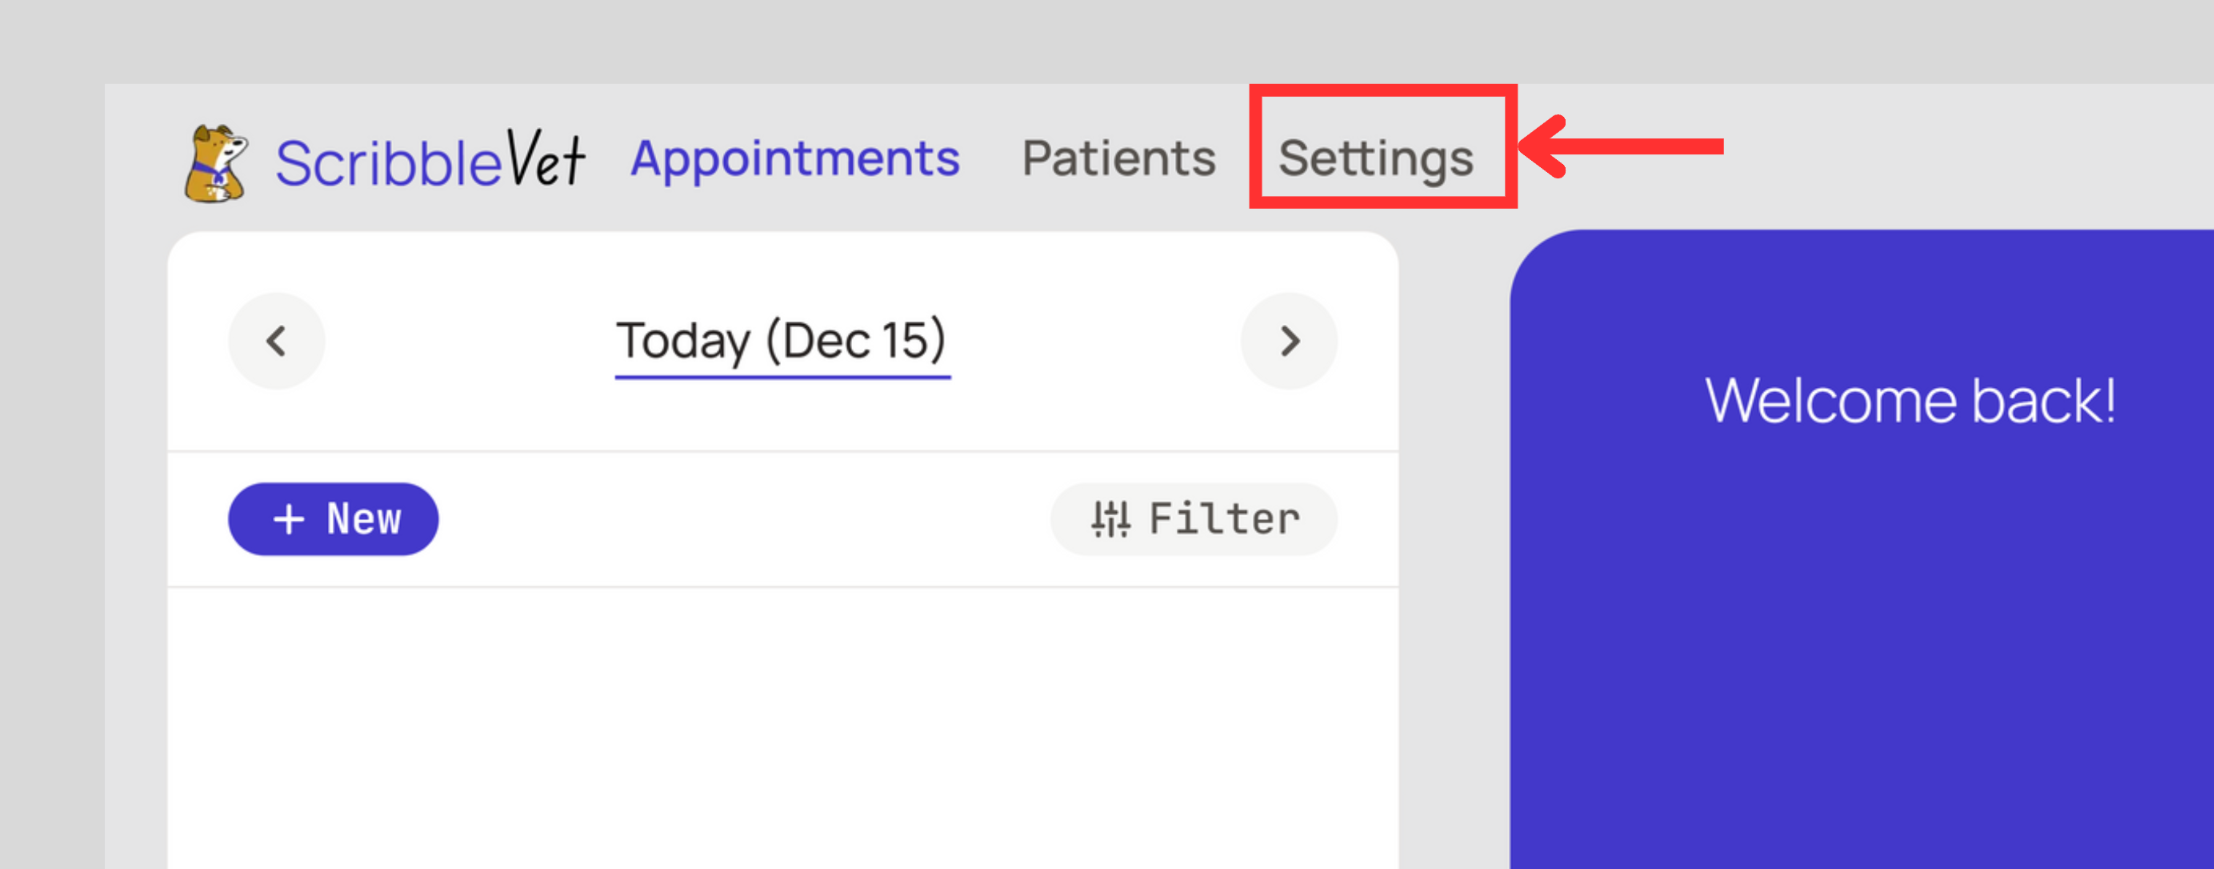
Step 1: Access your settings
- Log into the ScribbleVet website. Passwords cannot be set from the mobile app at this time.
- Once logged in, select the "Settings" tab located at the top of the screen.
- Shortcut: Click here to go directly to the settings page.
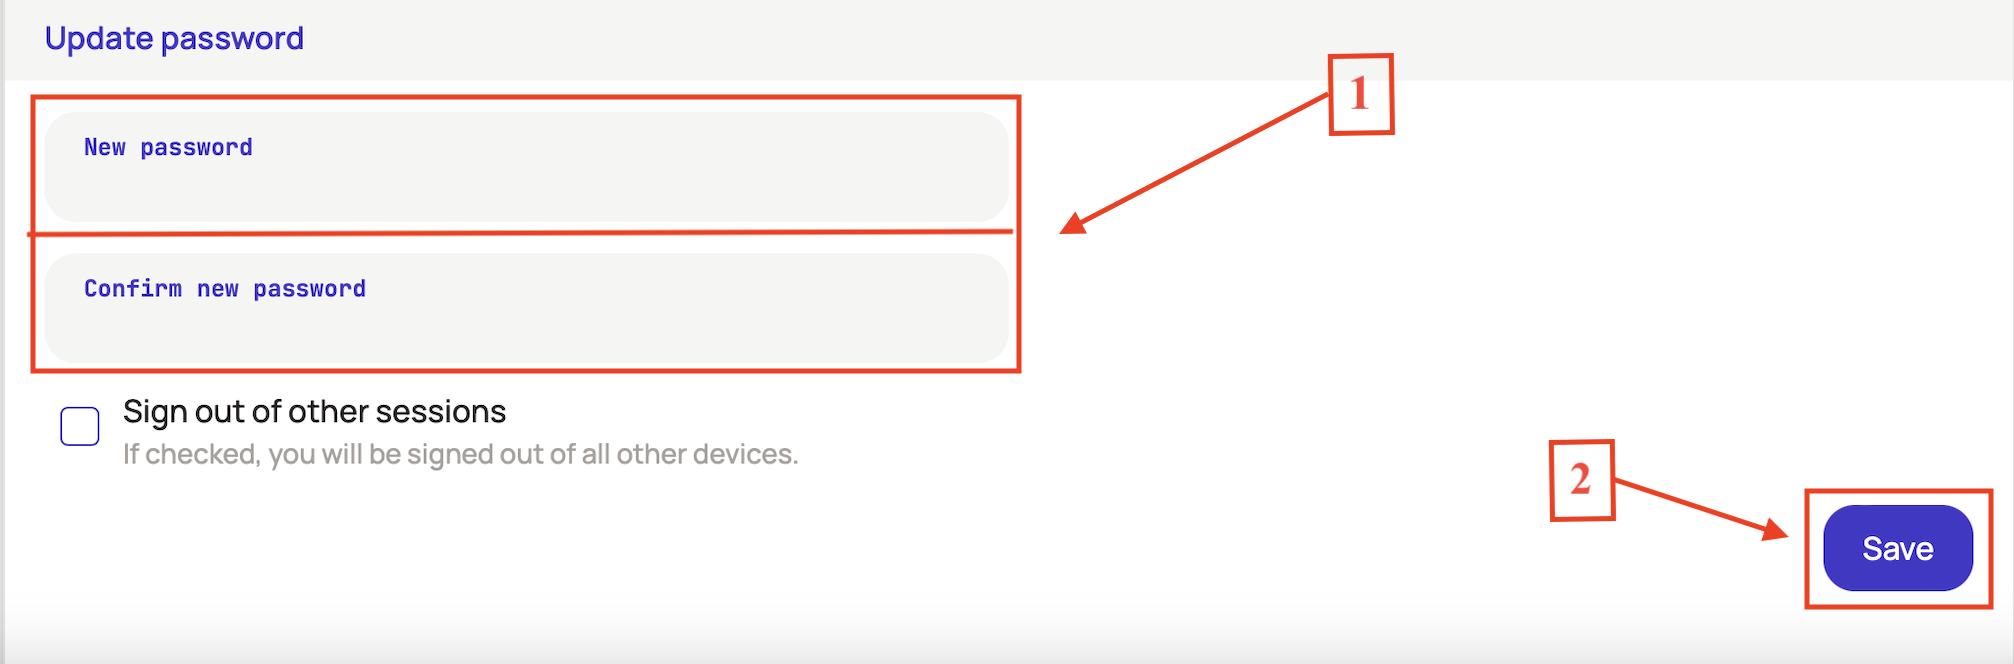
Step 2: Update your password
On the settings page, find the "Update Password" section.
- Enter your desired password in the "New password" field.
- Confirm your new password by entering it again.
- Click "Save" to set your new password.
The next time you sign in, you'll have two options:
a) Enter your newly created password
b) Use the six-digit code method (in case you forget your password)
Remember to choose a strong, unique password to keep your account secure.
Update patient name and details
Need to fix a misspelled name or distinguish between multiple ‘Fluffy’s? No problem! Here's how to update patient information:
Step 1: Access patient management
On Web:
- Click the"Patients" tab located at the top left of the screen.
- Shortcut: Click here to go directly to the Patients page.
On Mobile:
- Tap the person icon.
- Select "Manage patients" from the menu.

Step 2: Find your patient
- Use the search function to locate the patient you want to update.
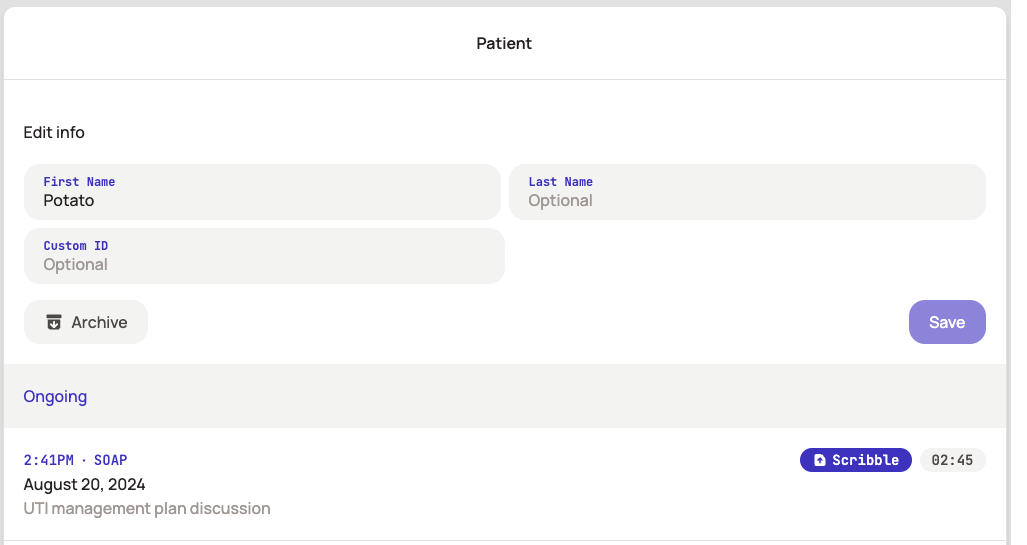
- Click or tap on the patient's name to open their profile.
- You can update the patient's first and last name and/or set an ID.
- On web, click the 'Save' button after making changes.
On mobile changes are saved automatically.
You can also view ongoing appointments and previously created notes for each patient.
Manage your email settings
Want to fine-tune how and when you receive your ScribbleVet notes? Set up your email preferences and delivery options:
Step 1: Access your settings
- Log into the ScribbleVet website.
- Once logged in, click on the "Settings" tab on the top of the screen.
- Shortcut: Click here to go directly to the settings page.
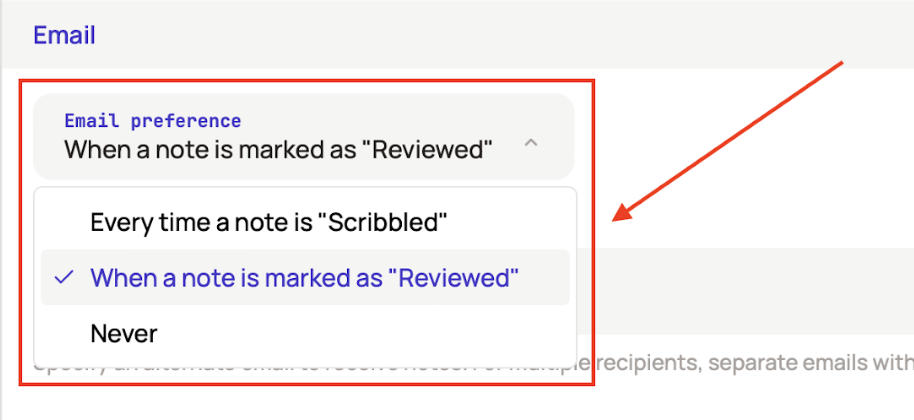
Step 2: Set your email preferences
Under the "Email" section, you'll find a dropdown menu for "Email preference". Choose when you want to receive automatic note emails:
- Every time a note is "Scribbled"
- When a note is marked as "Reviewed" (default setting)
- Never
Tip: You can always manually email a note by clicking the email button on any appointment page!
Step 3: Configure email delivery options
In the same "Email" section, you'll see an "Alternate email address" box where you can enter any additional email addresses where you'd like to receive notes. For multiple addresses, separate them with commas.
Why use multiple addresses? It's great for:
- Sending notes to a shared clinic inbox
- Accessing notes across different devices
- Keeping your team in the loop
Don't forget to hit the "Save" button to apply your new settings!

Uploading and downloading audio files
ScribbleVet offers flexibility in how you capture and manage audio for your notes.
Uploading audio files
On Website:
- Look for the upload button next to the record button
- Click to select and upload your audio file

On Mobile:
- Long-press the red record button
- Select the audio file you wish to upload
Pro Tip: You can upload audio in addition to or instead of recording directly in ScribbleVet.
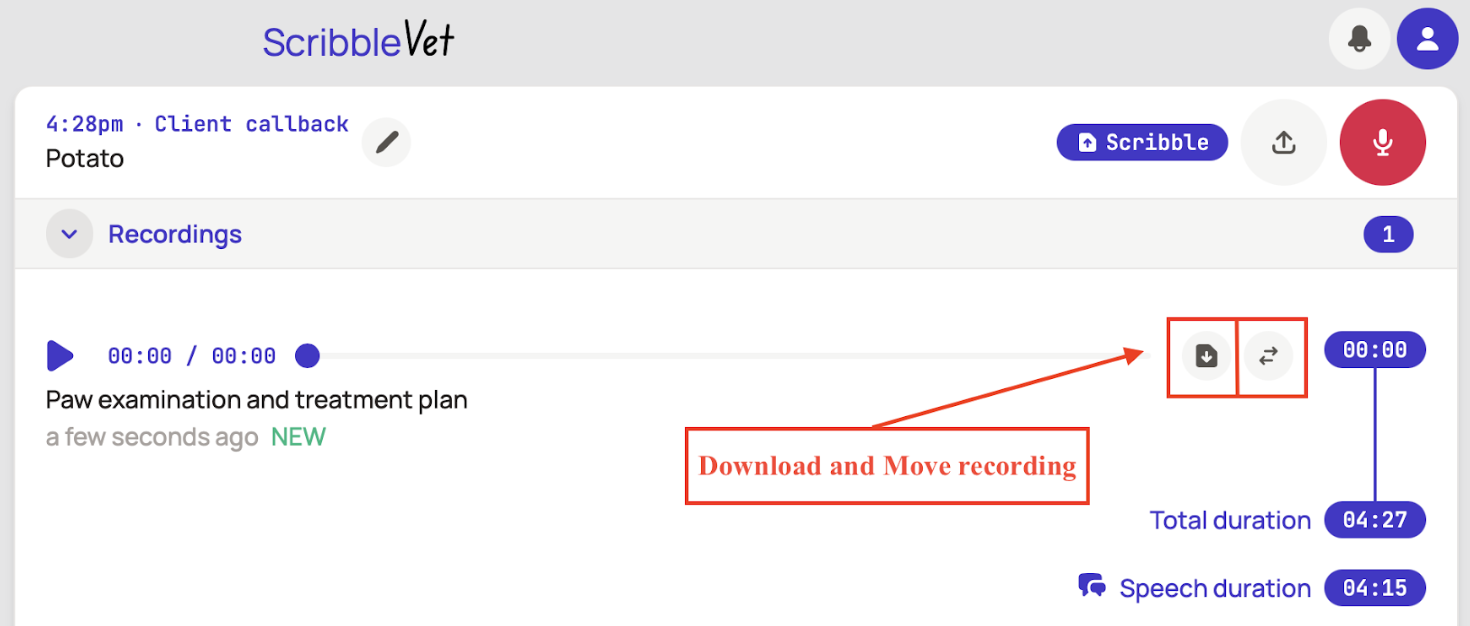
Download audio files
Audio recordings are automatically deleted after 90 days. We recommend downloading important audio files for your records before this time.
- Click the download button next to the desired audio file
- Click to save the file to your device
You can also move audio files to a different appointment in case you recorded under the wrong patient.
Converting to a paid subscription
Has ScribbleVet helped you save time on your notes? Here's how to upgrade from your free trial to a paid subscription:
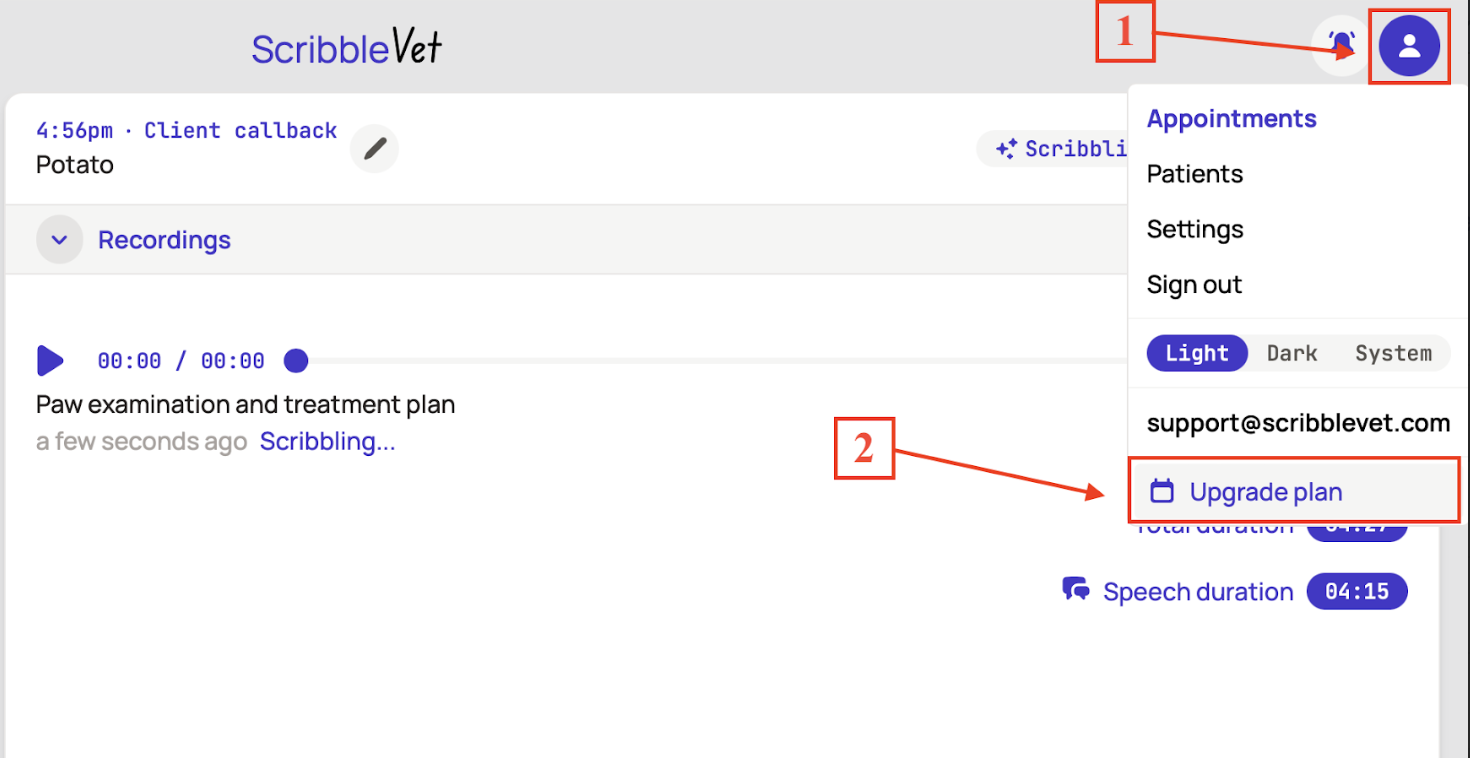
Step 1: Access the upgrade page
- On the ScribbleVet website, click the person icon in the top right corner [1]
- Select "Upgrade plan" from the dropdown menu [2]
Step 2: Choose your plan(s)
- Add email accounts for each subscribing doctor
- Select whether they require a full-time (3+ days/week) or part-time (2 days/week) subscription [1]
- Click the green + button to add another account to subscribe, as needed[2]
Step 3: Set up billing details
- Under "Send invoice to" enter a billing email (if different from your ScribbleVet account) [3]
- Choose between monthly or annual billing cycles(10% discount for annual plans)[4]

Step 4: Review and pay
- Click 'Review plan'
- You will be taken to a Stripe checkout page where you can complete payment via credit or debit card
Billing questions?
- For group pricing (6+ full-time equivalent subscriptions) send us details about your billing via the "Contact us" form
- Need invoicing, vendor establishment, or alternative payment methods? Let us know through the "Contact us" form or email us at support@scribblevet.com
Please allow up to one hour for your subscription to be processed.
Remember, ScribbleVet offers flexible subscription options with no upfront contracts or cancellation fees. We're here to support your practice, whether you're a part-time locum or a busy full-time clinician!